# Login Options
Since TE v3.1, we offer login options with multiple platforms. You can:
- Login by scanning the QR code with third-party apps;
- One-click login through third-party apps;
- Receive notification from TE with third-party apps.
Note: the guidance shall not apply to SaaS and companies that log in through LDAP authentication.
To ensure that all the above functions could be realized, please operate in accordance with the steps specified in this document.
Support binding with Enterprise WeChat, DingTalk, or Feishu; click the product name to check the corresponding guidance:
# I. Binding with Third-party Apps
# 1.1 Enterprise WeChat
Step 1 Create apps
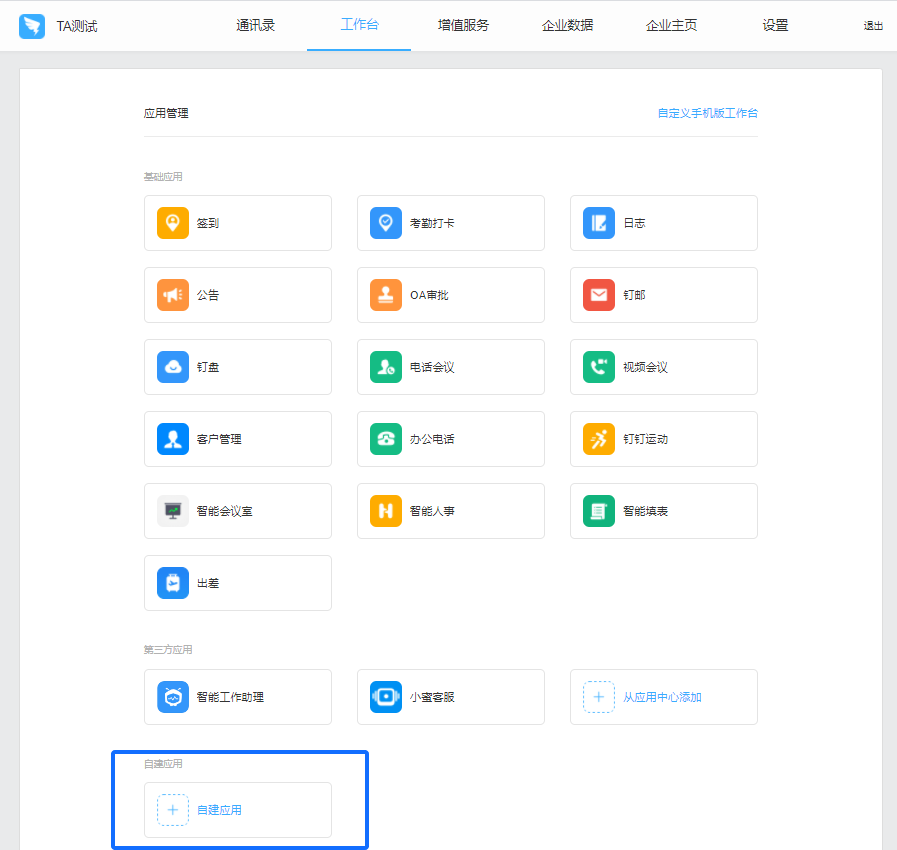
The admin of Enterprise WeChat enters Enterprise WeChat Management Background (opens new window) and creates apps in 「application management」-「application」-「self-creation」.
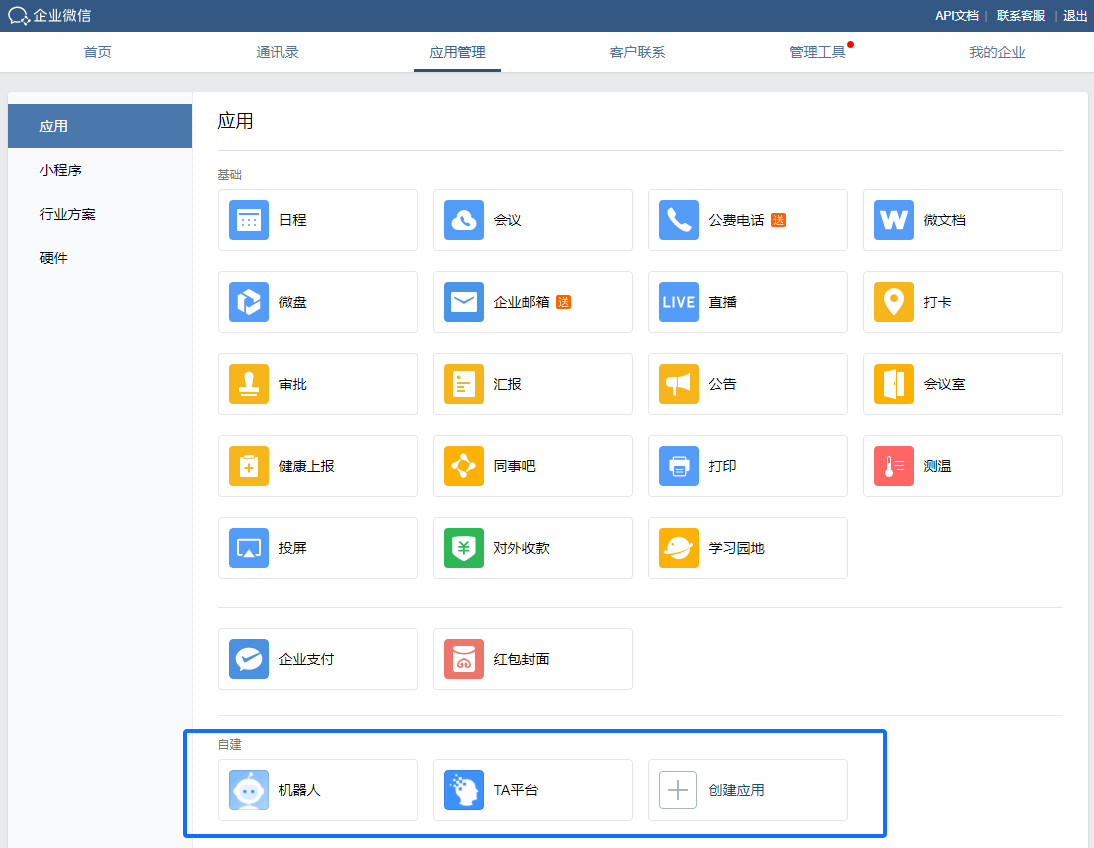
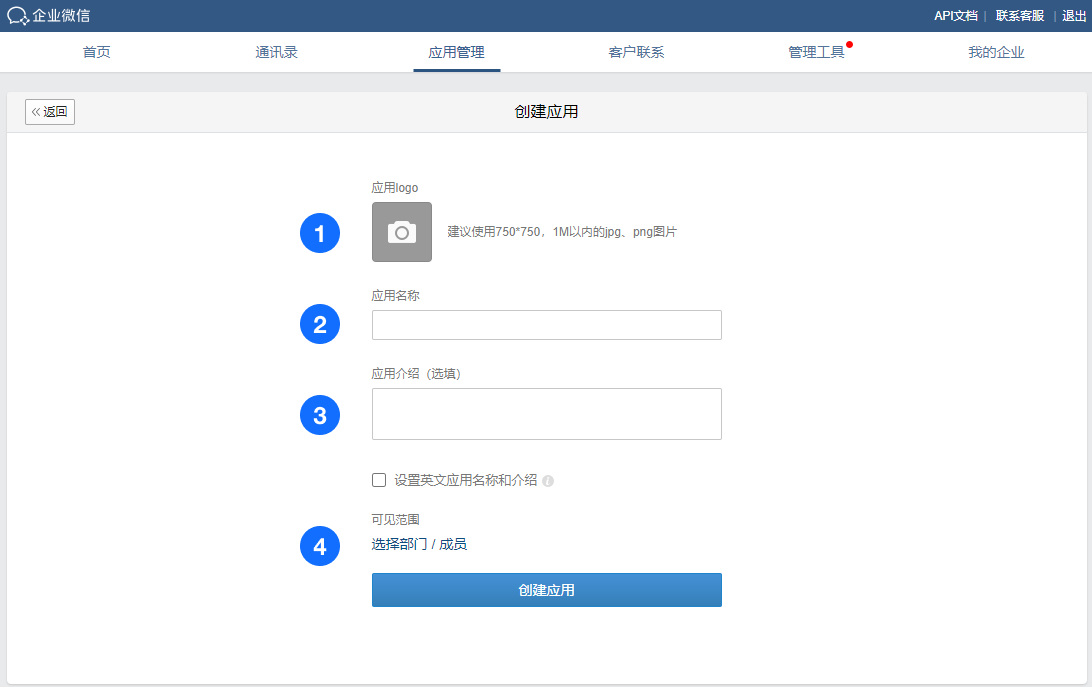
- Upload the logo of the app. If you want to use the TE logo, please click here to download (opens new window)
- Fill out the app name, for example, the TE platform
- Fill out the app description
- Select the visible range. The operator should be added to the visible range, and only employees within the visible range could log in to the TE platform through Enterprise WeChat
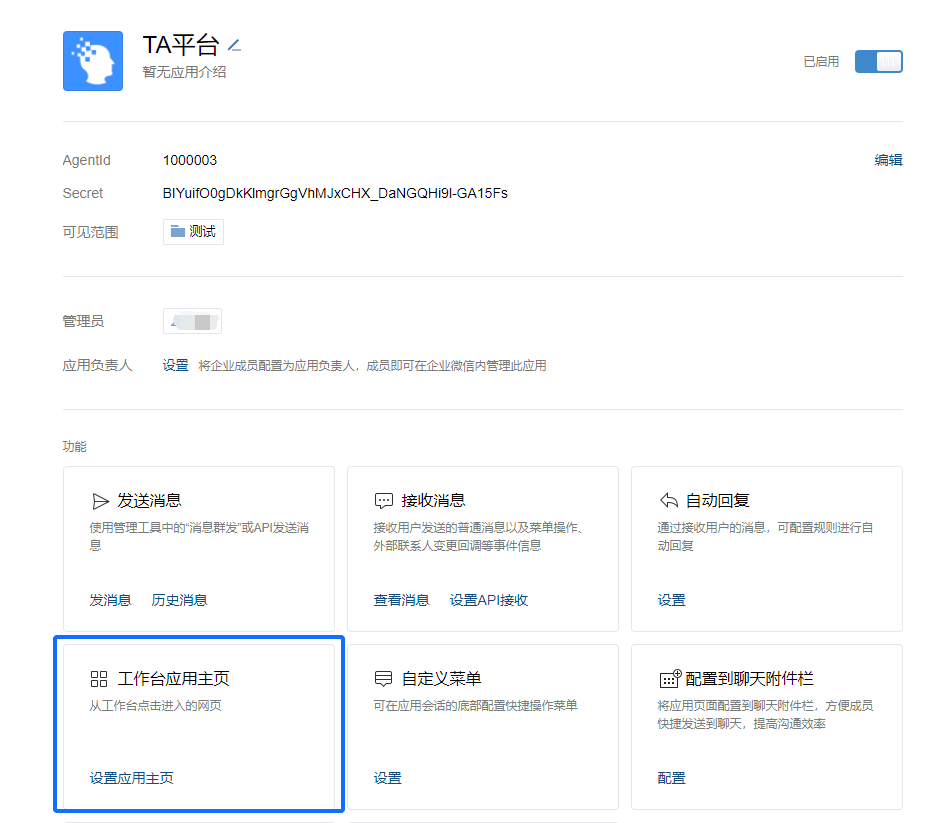
Step 2 Allow entering the TE platform from the client side of Enterprise WeChat
Click to enter the created app; click the 「function」 module at the bottom of the page to set the 「workbench application home page」; enter the URL of the app homepage in the pop-up window: https://priviateclusteraddress/#/login (如https://ta.thinkingdata.cn/#/login)
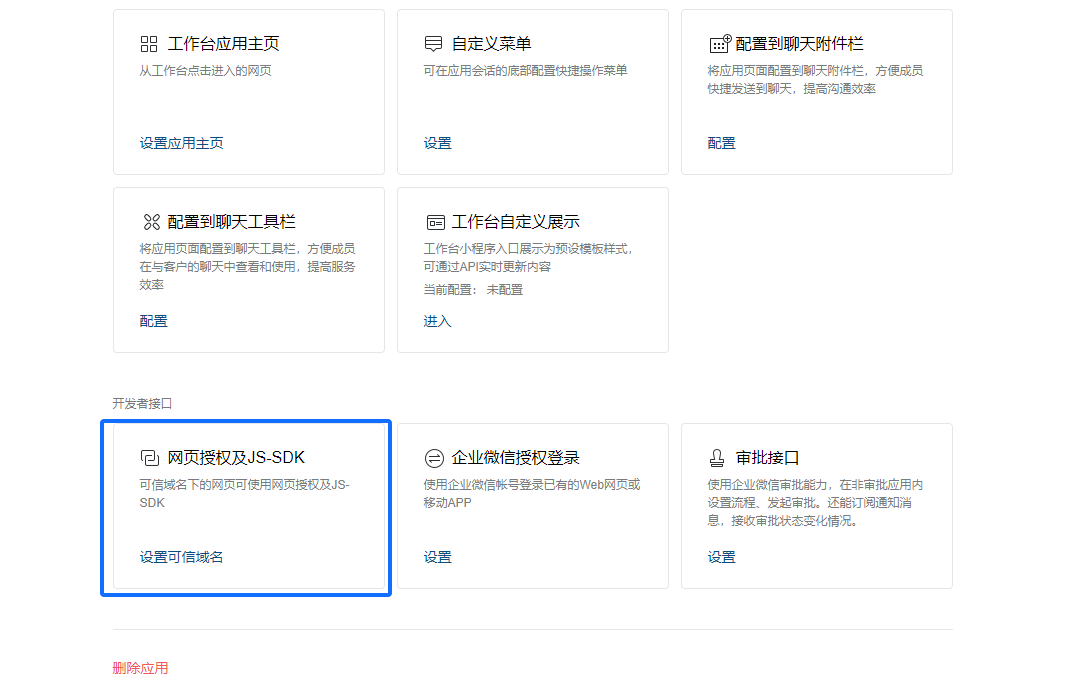
Step 3 Obtain information about the Enterprise WeChat account
Click 「set trusted domain」 in the「developer interface」→「webpage authorization and JS-SDK」at the bottom of the page; input the name of the trusted domain in the pop-up window (private cluster address).

Step 4 Enable login by scanning with Enterprise WeChat
「Developer interface」→「login authorization with Enterprise WeChat」, click「set」
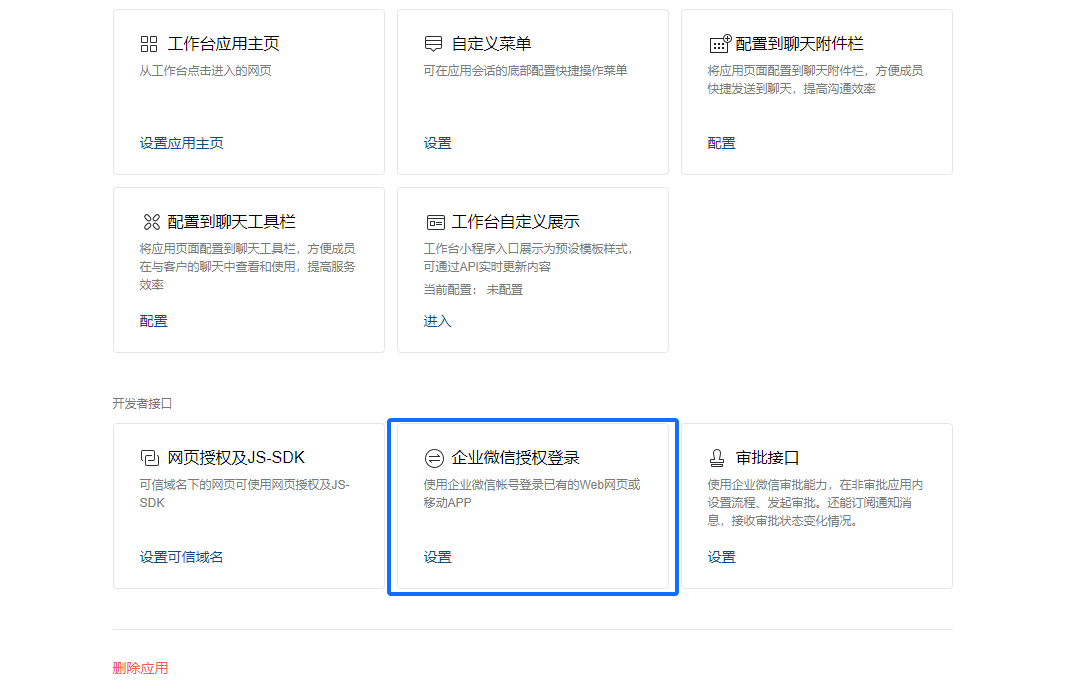
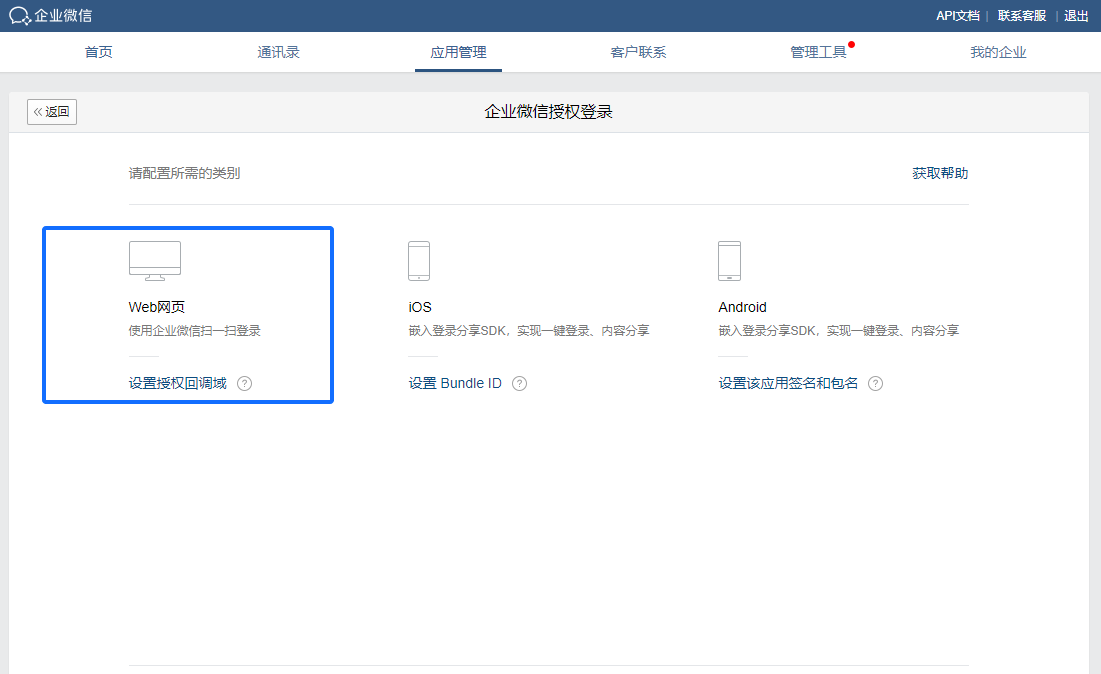
Select 「Web page」→「set the authorization callback domain」on the setting page. Input the address of private cluster and click save.
The above operations are settings to be completed at the management background of Enterprise WeChat. Please complete the following configuration at the TE platform.
Step 5 Bind with Enterprise WeChat app in TE system management
The TE root admin shall enter 「system management」 and click 「third-party platform management」; select Enterprise WeChat and click bind.
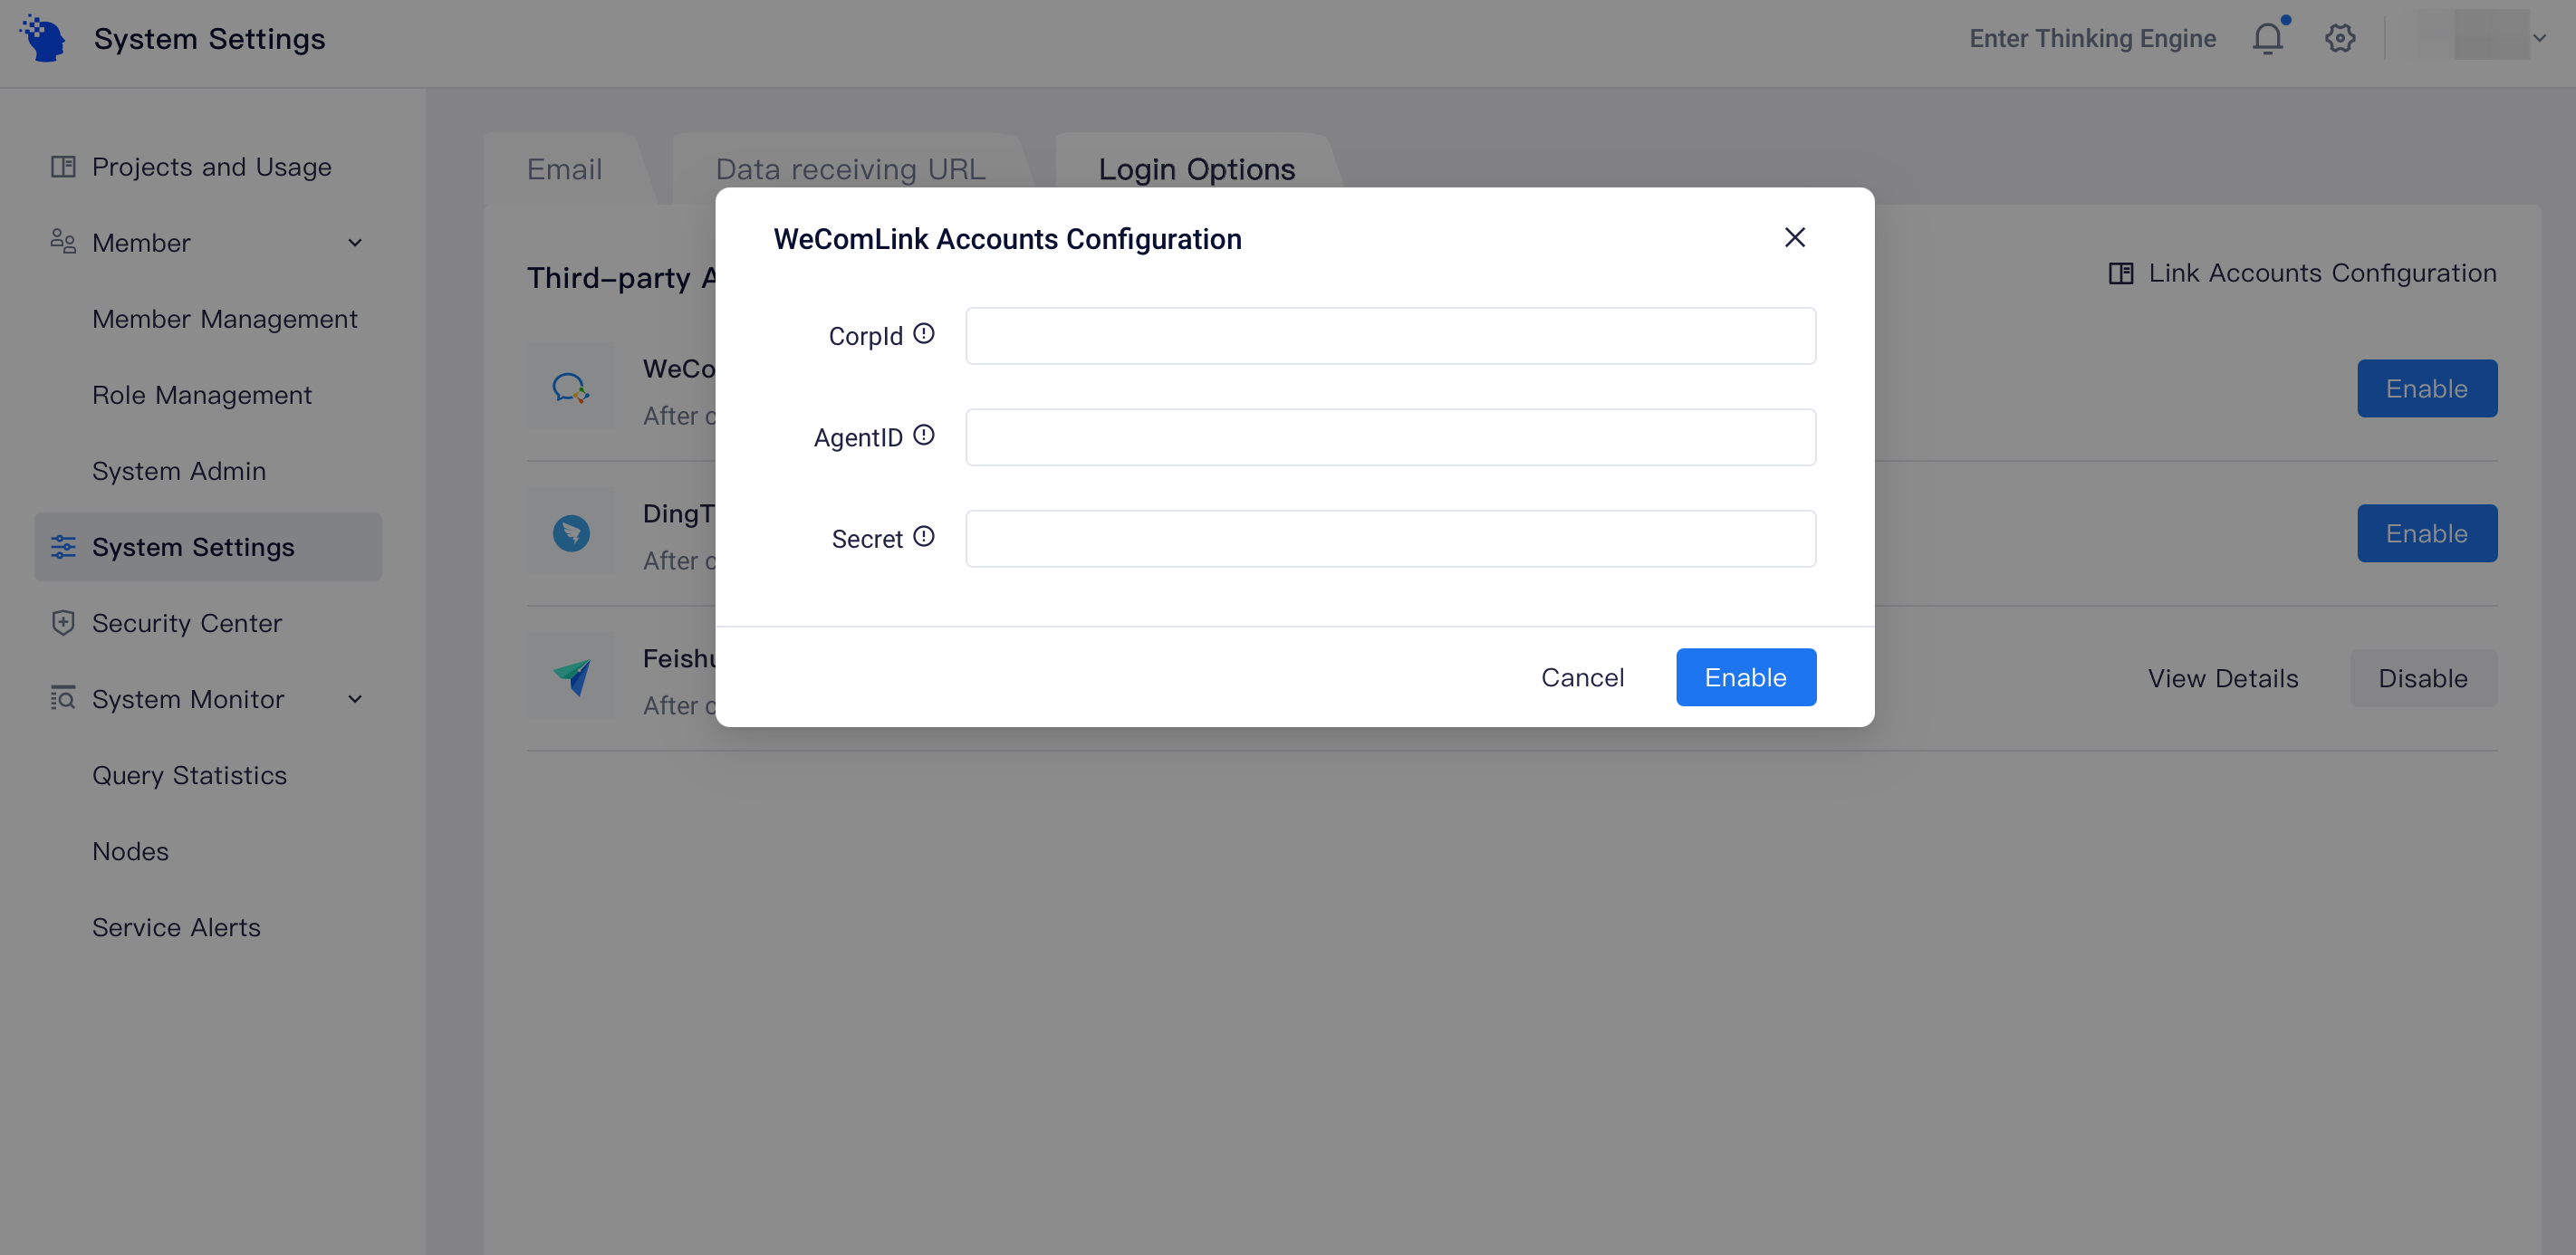
- Enterprise ID: Enterprise WeChat management background「my enterprise」-「enterprise information」
- AgentId&Secret: homepage of the created app
You have bound the TE system with Enterprise WeChat after completing the above operations.
# 1.2 DingTalk
WARNING
Given the Cookie security policy of DingTalk, you have to visit the workbench of DingTalk with Https. Please contact TE operation and maintenance staff to change ta-web component configuration after completing the following operations.
Step 1 Create apps
The enterprise administrator of DingTalk enters DingTalk (opens new window)Open Platform (opens new window) after logging in, and click「create apps」in the 「workbench」
Select「H5 mini-app」in「enterprise internal development」 and click to create an app.
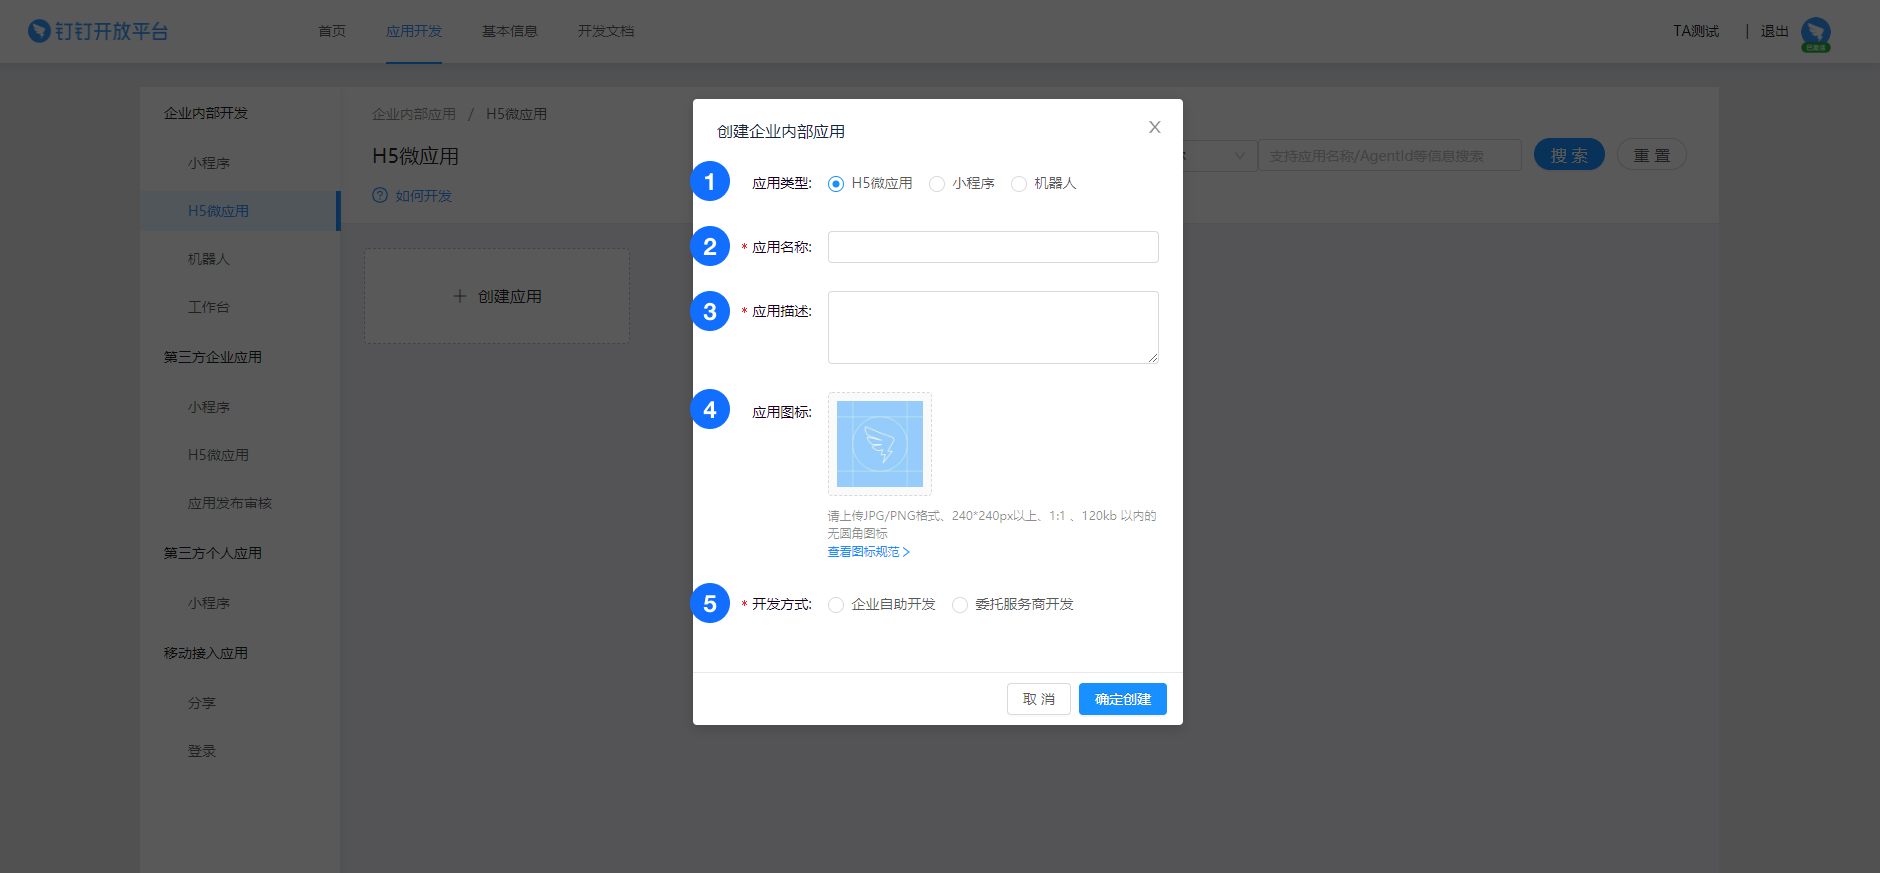
- App type: H5 mini-app
- App name: e.g., TE platform
- App description
- App logo: if you want to use the TE logo, please click here to download (opens new window)
- Development mode: independent development by enterprises
- Step 2 Allow entering the TE platform from the client side of DingTalk
- Select「development management」 on the detail page of the created mini-app to edit and save the following content
- Development mode: develop apps
- Server exit IP: legal IP list when the API of DingTalk server is called
- App homepage address: https://privateclusteraddress/#/login,e.g., https://ta.thinkingdata.cn/#/login
- PC homepage address: https://privateclusteraddress/#/login

Step 3 Obtain information about the login account of DingTalk
Click「permission management」 on the current page to set the permission range and add the interface permission of 「address book read-only」

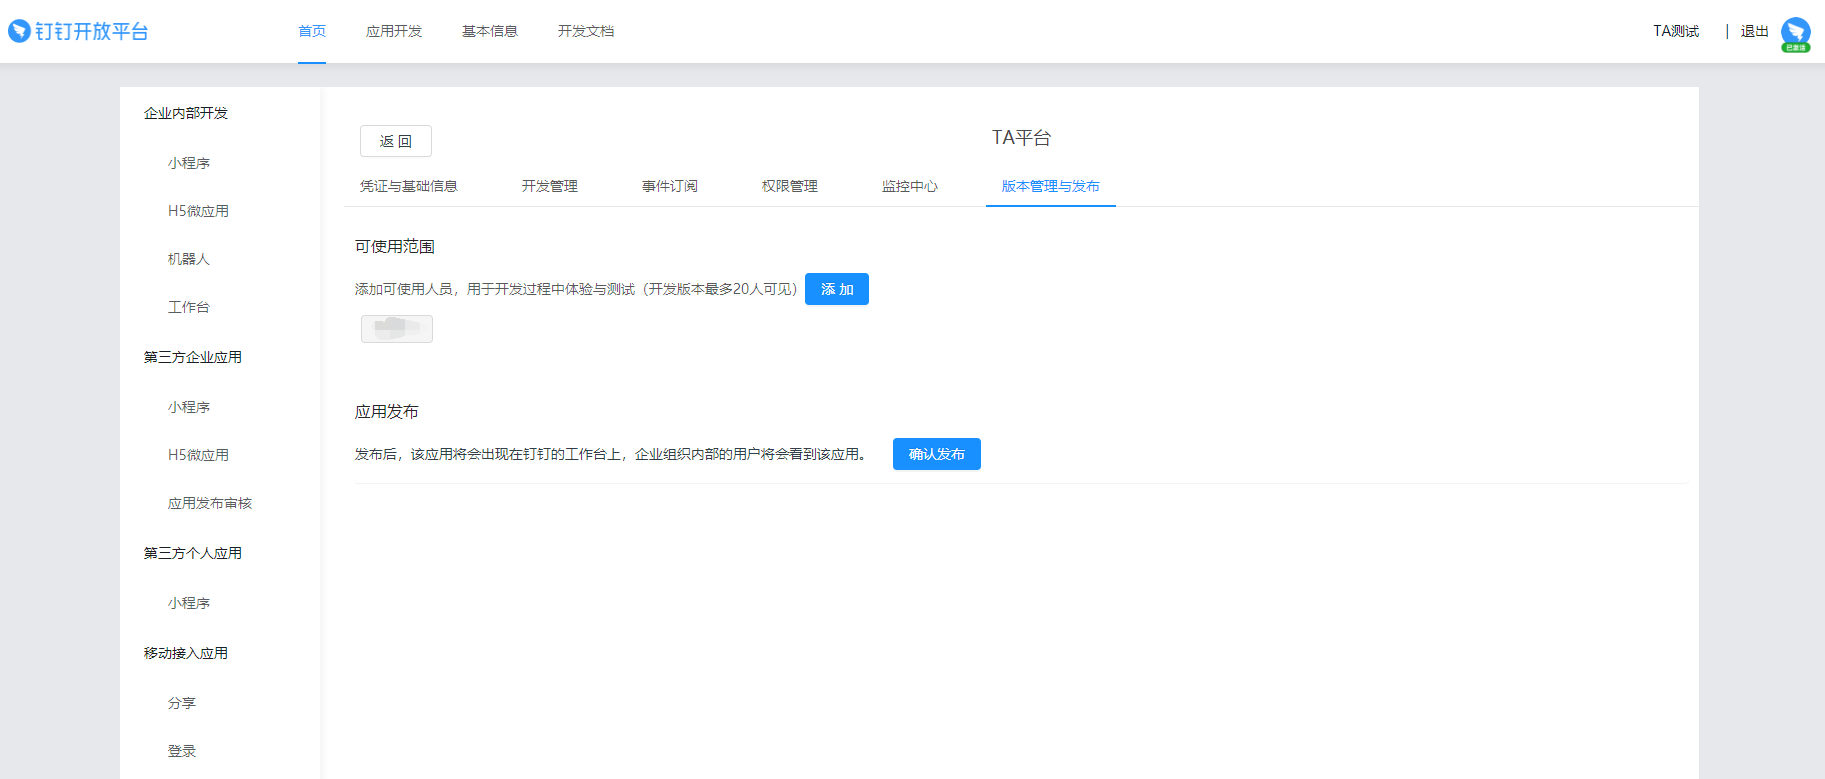
Step 4 Set the app usage scope and publish the app
Select the staff to be authorized, and only staff within the usage scope could log in to the TE platform through DingTalk
Step 5 Enable login by scanning with DingTalk
Select「login」in the「mobile access app」 module in the navigation bar on the left side; click「create login-by-scanning app authorization」

- App name: e.g., TE platform
- Description
- Authorized LOGO address: private cluster address
- Call-back domain name: private cluster address
The above operations are settings to be completed at the management background of DingTalk. Please complete the following configuration at the TE platform.
Step 6 Bind with DingTalk app in TE system management
The TE root admin shall enter 「system management」 and click 「third-party platform management」; select DingTalk and click bind.

- CorpID: can be found on the homepage of the DingTalk development platform
- appID & appSecret:Check in「app development」→「mobile access app」→「login」 (opens new window)
- AgentId & AppKey & AppSecret:「application development」→「H5 mini-app」→click the created app to check
You have bound the TE system with DingTalk after completing the above operations.
# 1.3 Feishu
Step 1 Feishu administrator enters Feishu Open Platform (opens new window), click「create apps」 and select「create self-developed app of enterprises」 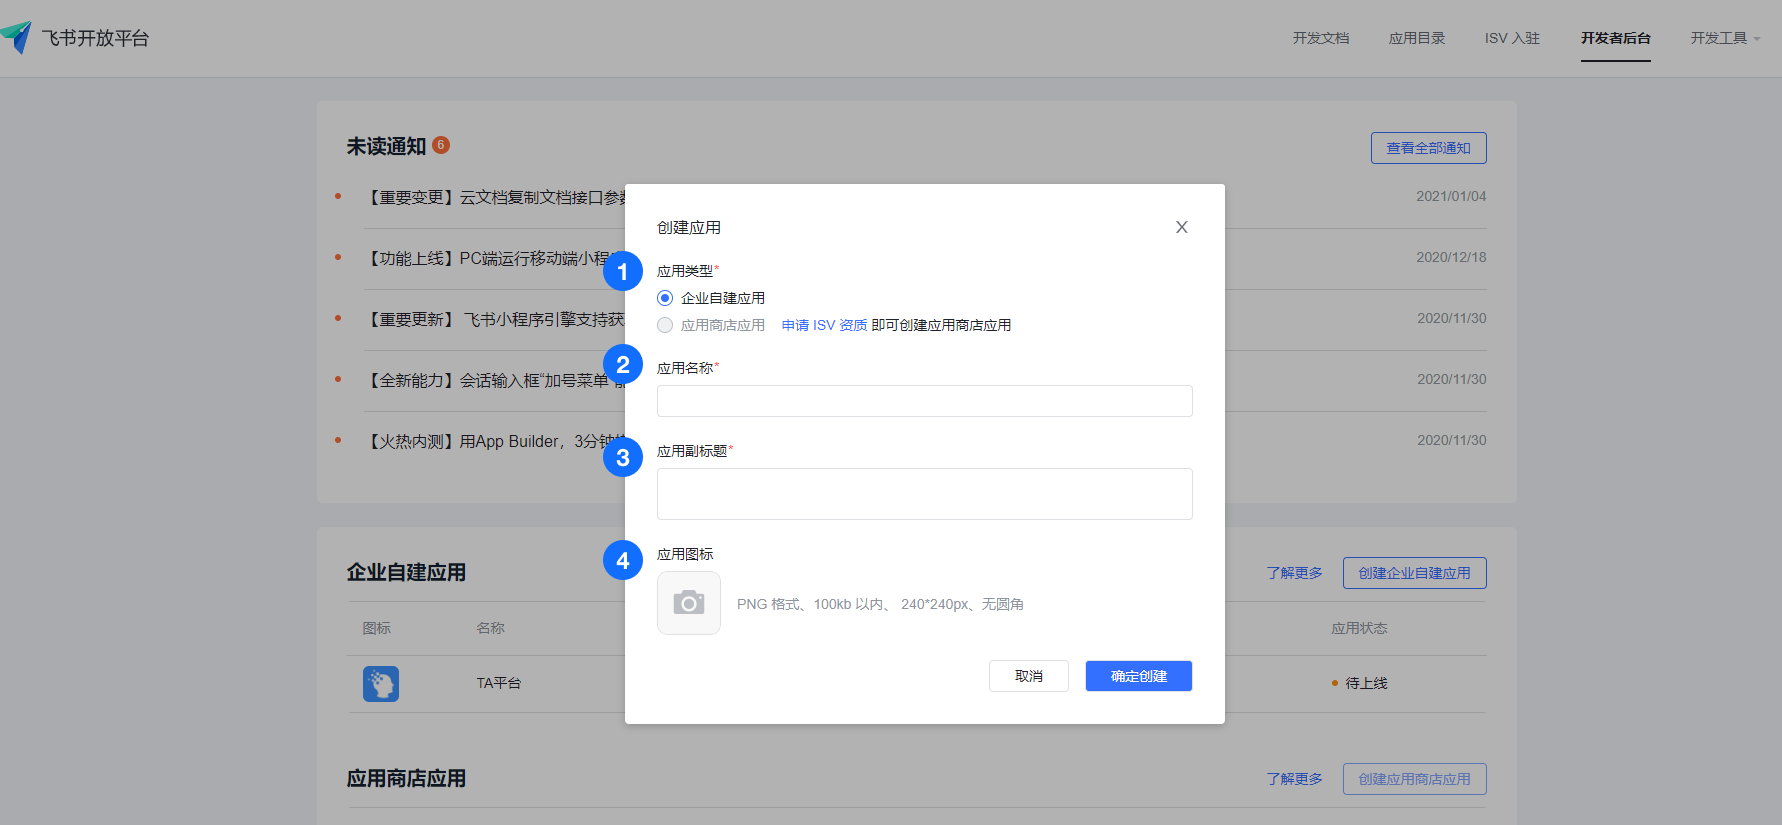
- App type: self-developed app of enterprises
- App name: e.g., TE platform
- Subtitle of app
- App logo: if you want to use the TE logo, please click here to download (opens new window)
Step 2 Allow entering the TE platform from the client side of Feishu
Click to enter the created app; click 「app function」→「webpage」:
- Click to enable the webpage
- Configure desktop homepage: https://privateclusteraddress/#/login. For example, https://ta.thinkingdata.cn/#/login
- Configure mobile homepage: https://privateclusteraddress/#/login.

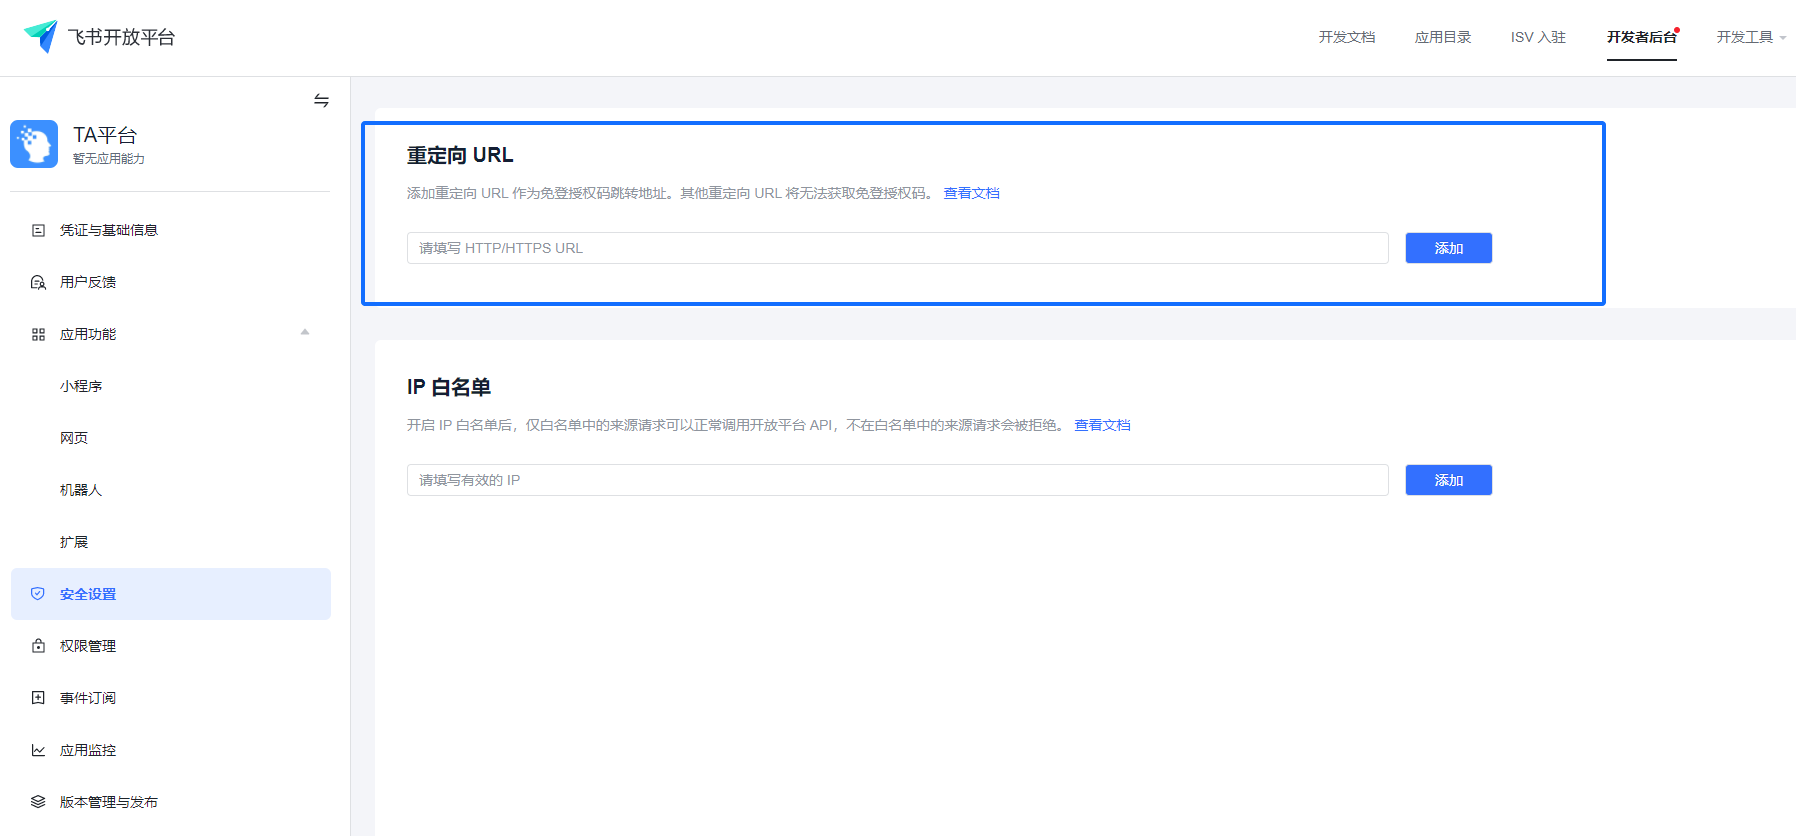
Step 3 Set URL whitelist exempted from providing the license code
Click「security setting」 to configure the redirection URL:https://privateclusteraddress/v1/sso/thirdLogin/callback
Step 4 Configure the message receive function
Click「permission management」 to add "obtain userid", "send a message in the name of the app", "permission of sending a message to multiple users simultaneously"

Click「app function」→「robot」; lick "enable the robot"
Step 5 Set the visible scope of the app and publish the app
Select the staff to be authorized, and only staff within the usage scope could log in to the TE platform through Feishu

TIP
Versions involving changes to personnel permission shall be approved by the administrator of Feishu. The released version could only come into effect after obtaining the approval of Feishu.
The above operations are settings to be completed at the Feishu Open Platform. Please complete the following configuration at the TE platform.
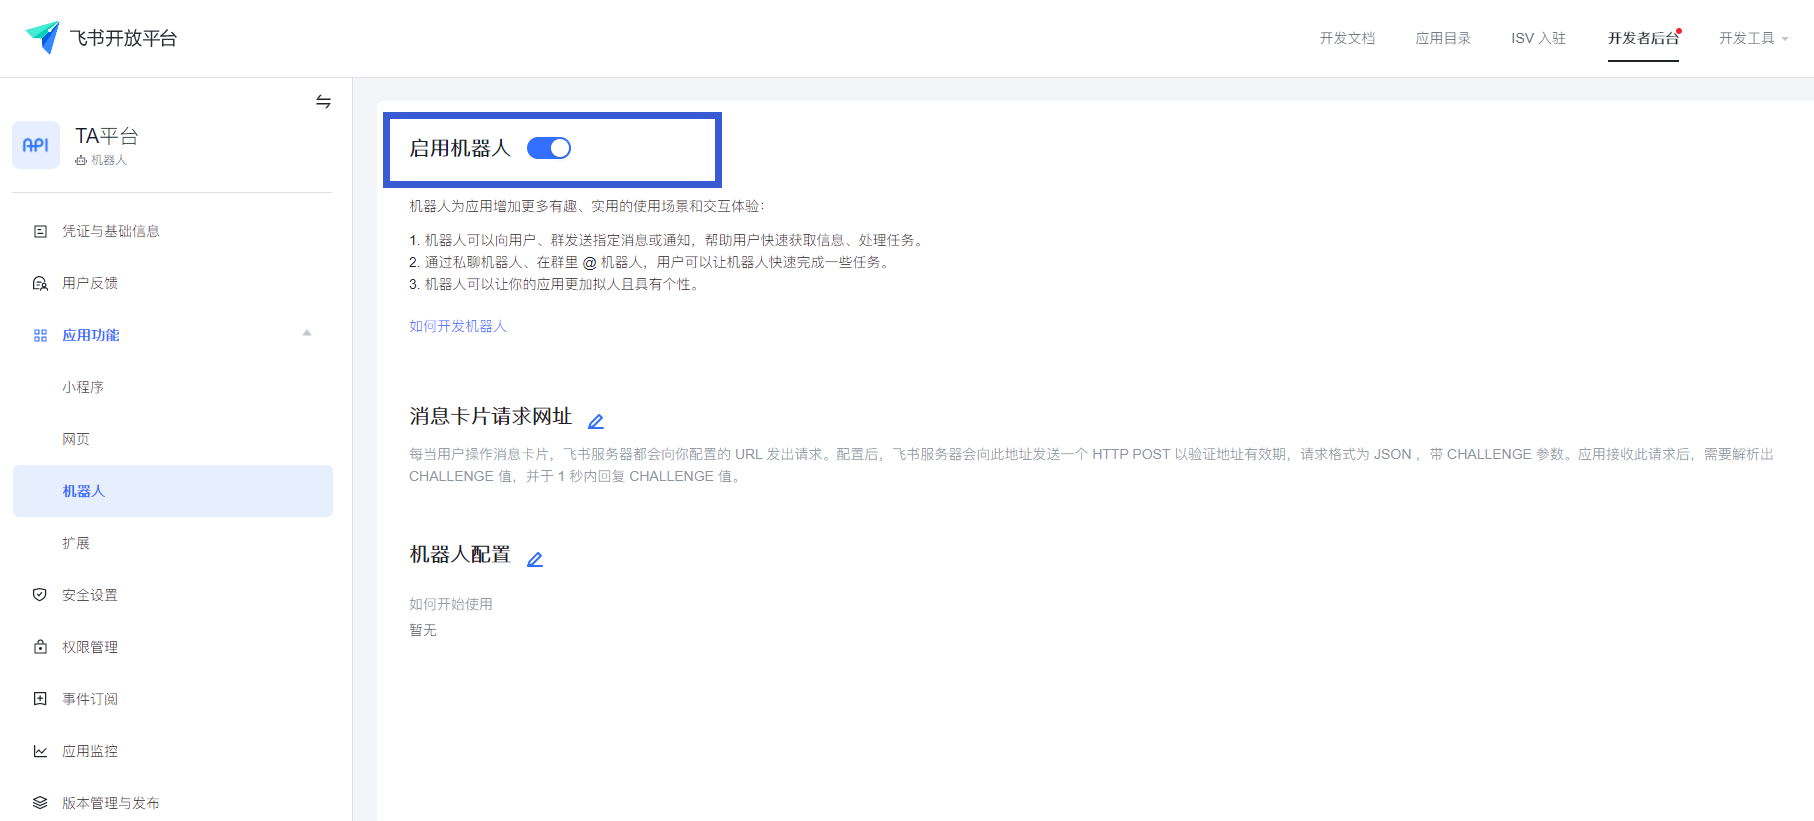
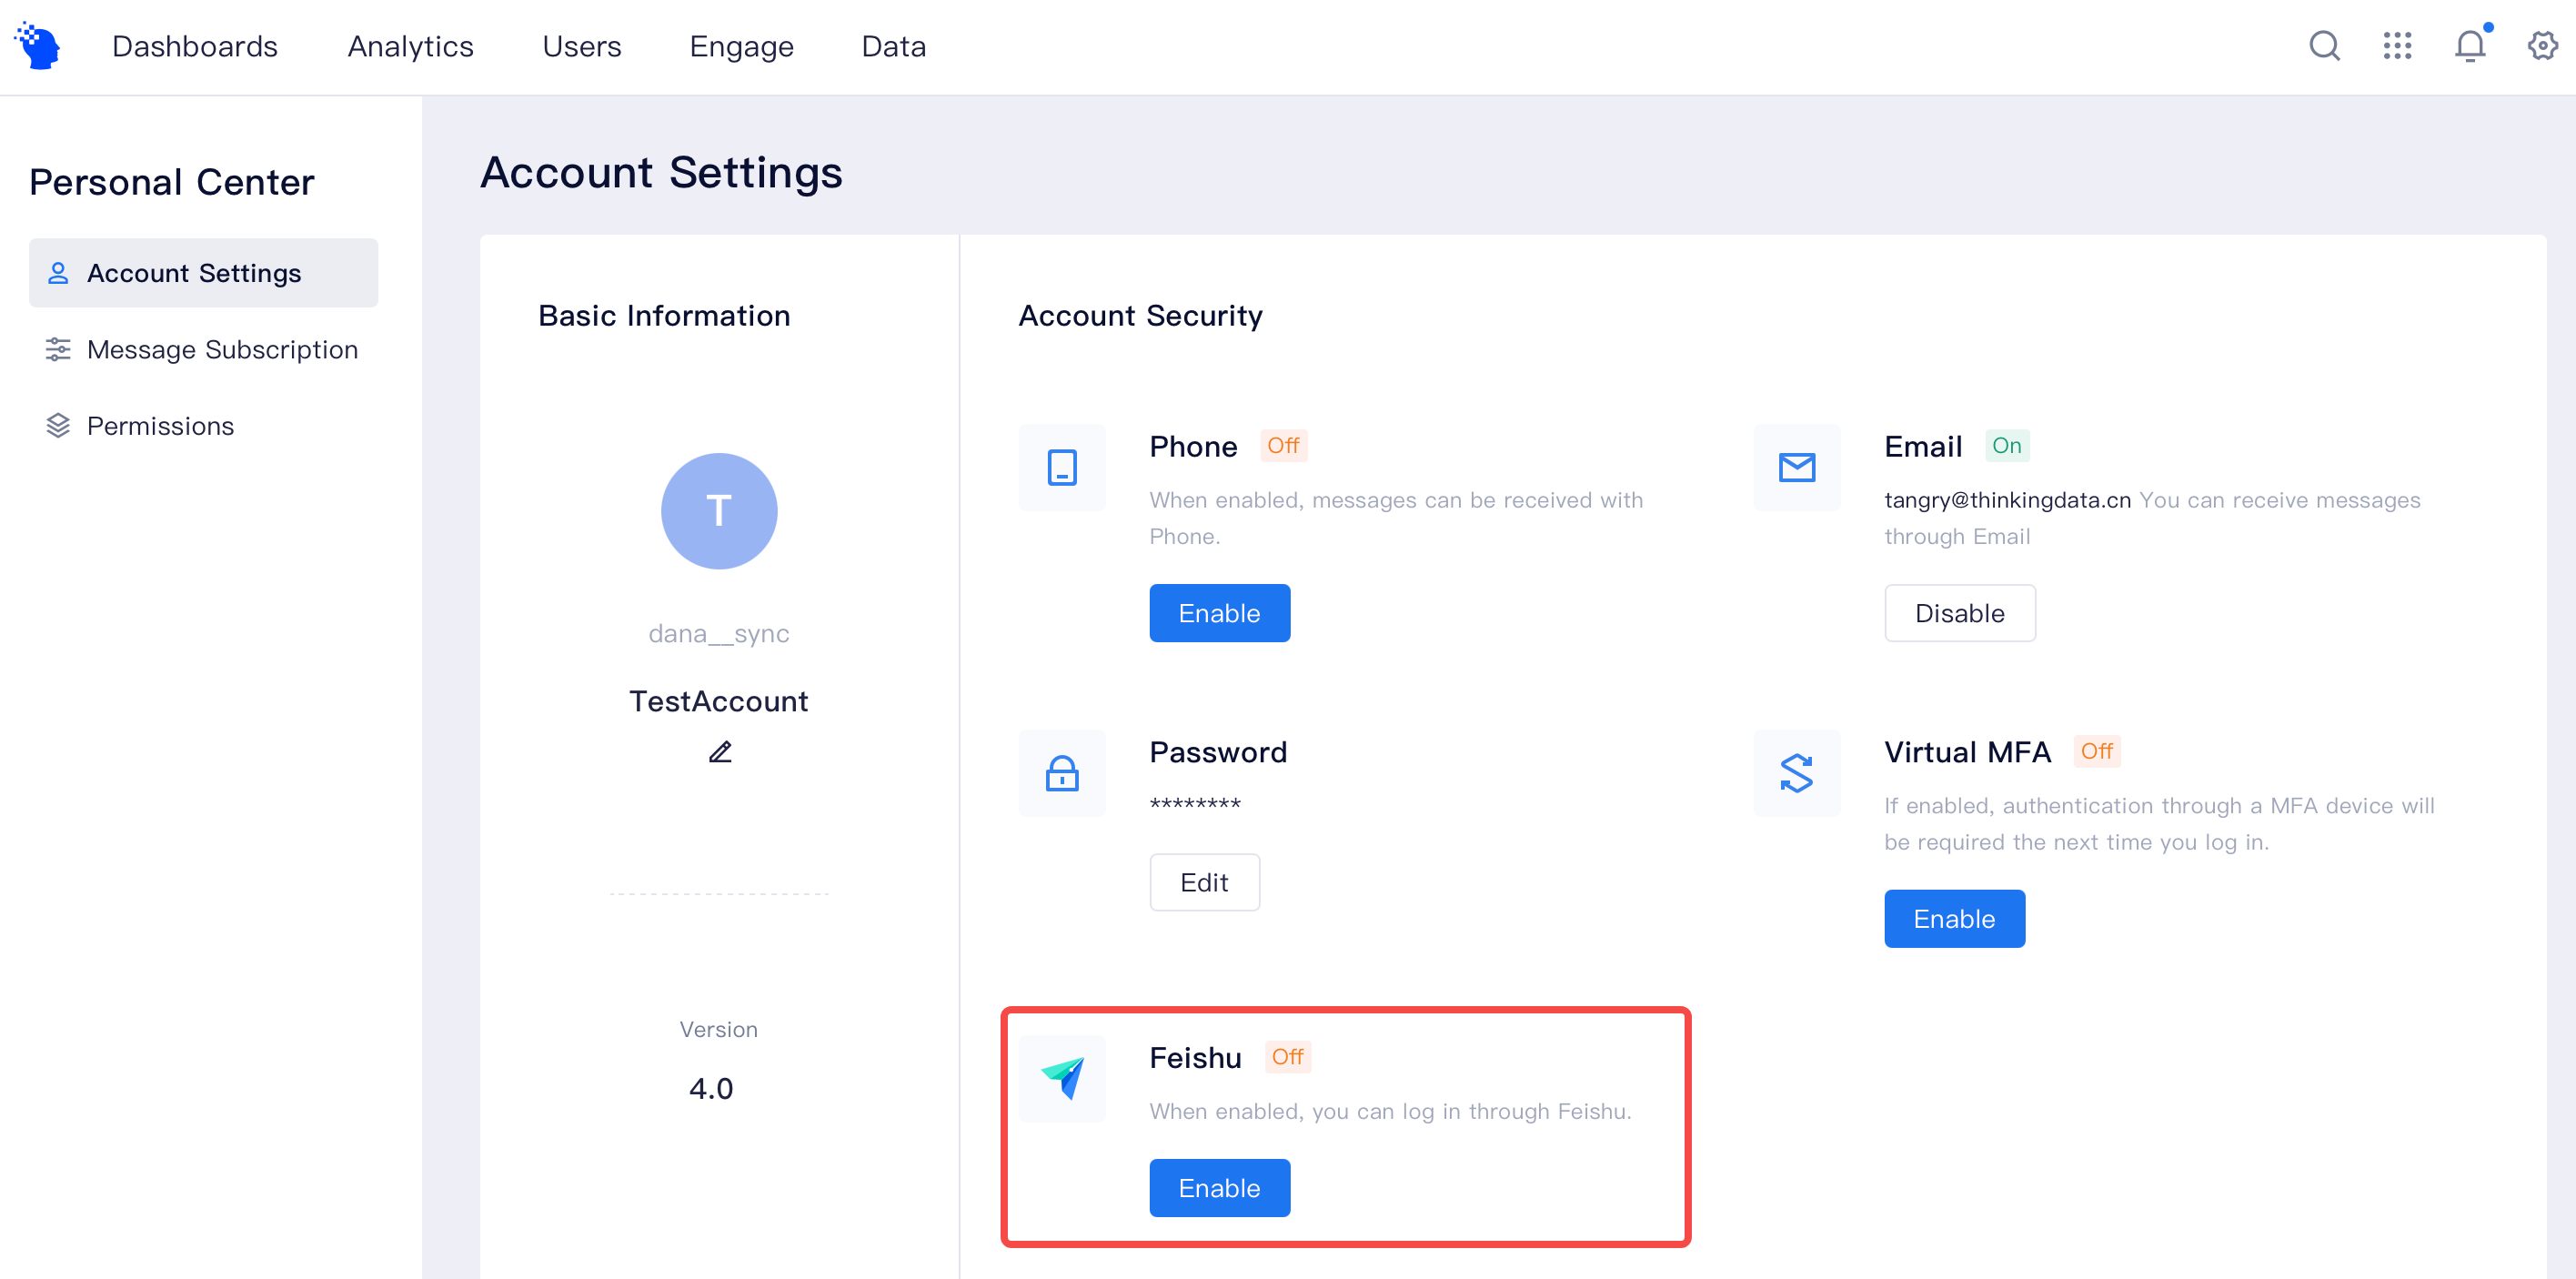
Step 6 Bind with Feishu app in TE system management
The TE root admin shall enter 「system management」 and click「third-party platform management」; select Feishu and click bind.

App ID & App Secret: to be checked in the「certificate and basic information」 of the created app
You have bound the TE system with Feishu after completing the above operations.
II. Bind with TE account
After the root admin binds the TE system with third-party apps, TE members could bind their TE accounts with such apps.
2.1 Bind with existing TE accounts
(1) Complete binding on 「personal setting」page after logging in
TE members should enter the「personal setting」page and click binding with personal accounts. Taking Enterprise WeChat as an example, TE accounts could be bound with Enterprise WeChat accounts after the user clicks binding on the「personal setting」page and scans the QR code
Note: only members within the visible scope could complete the binding process
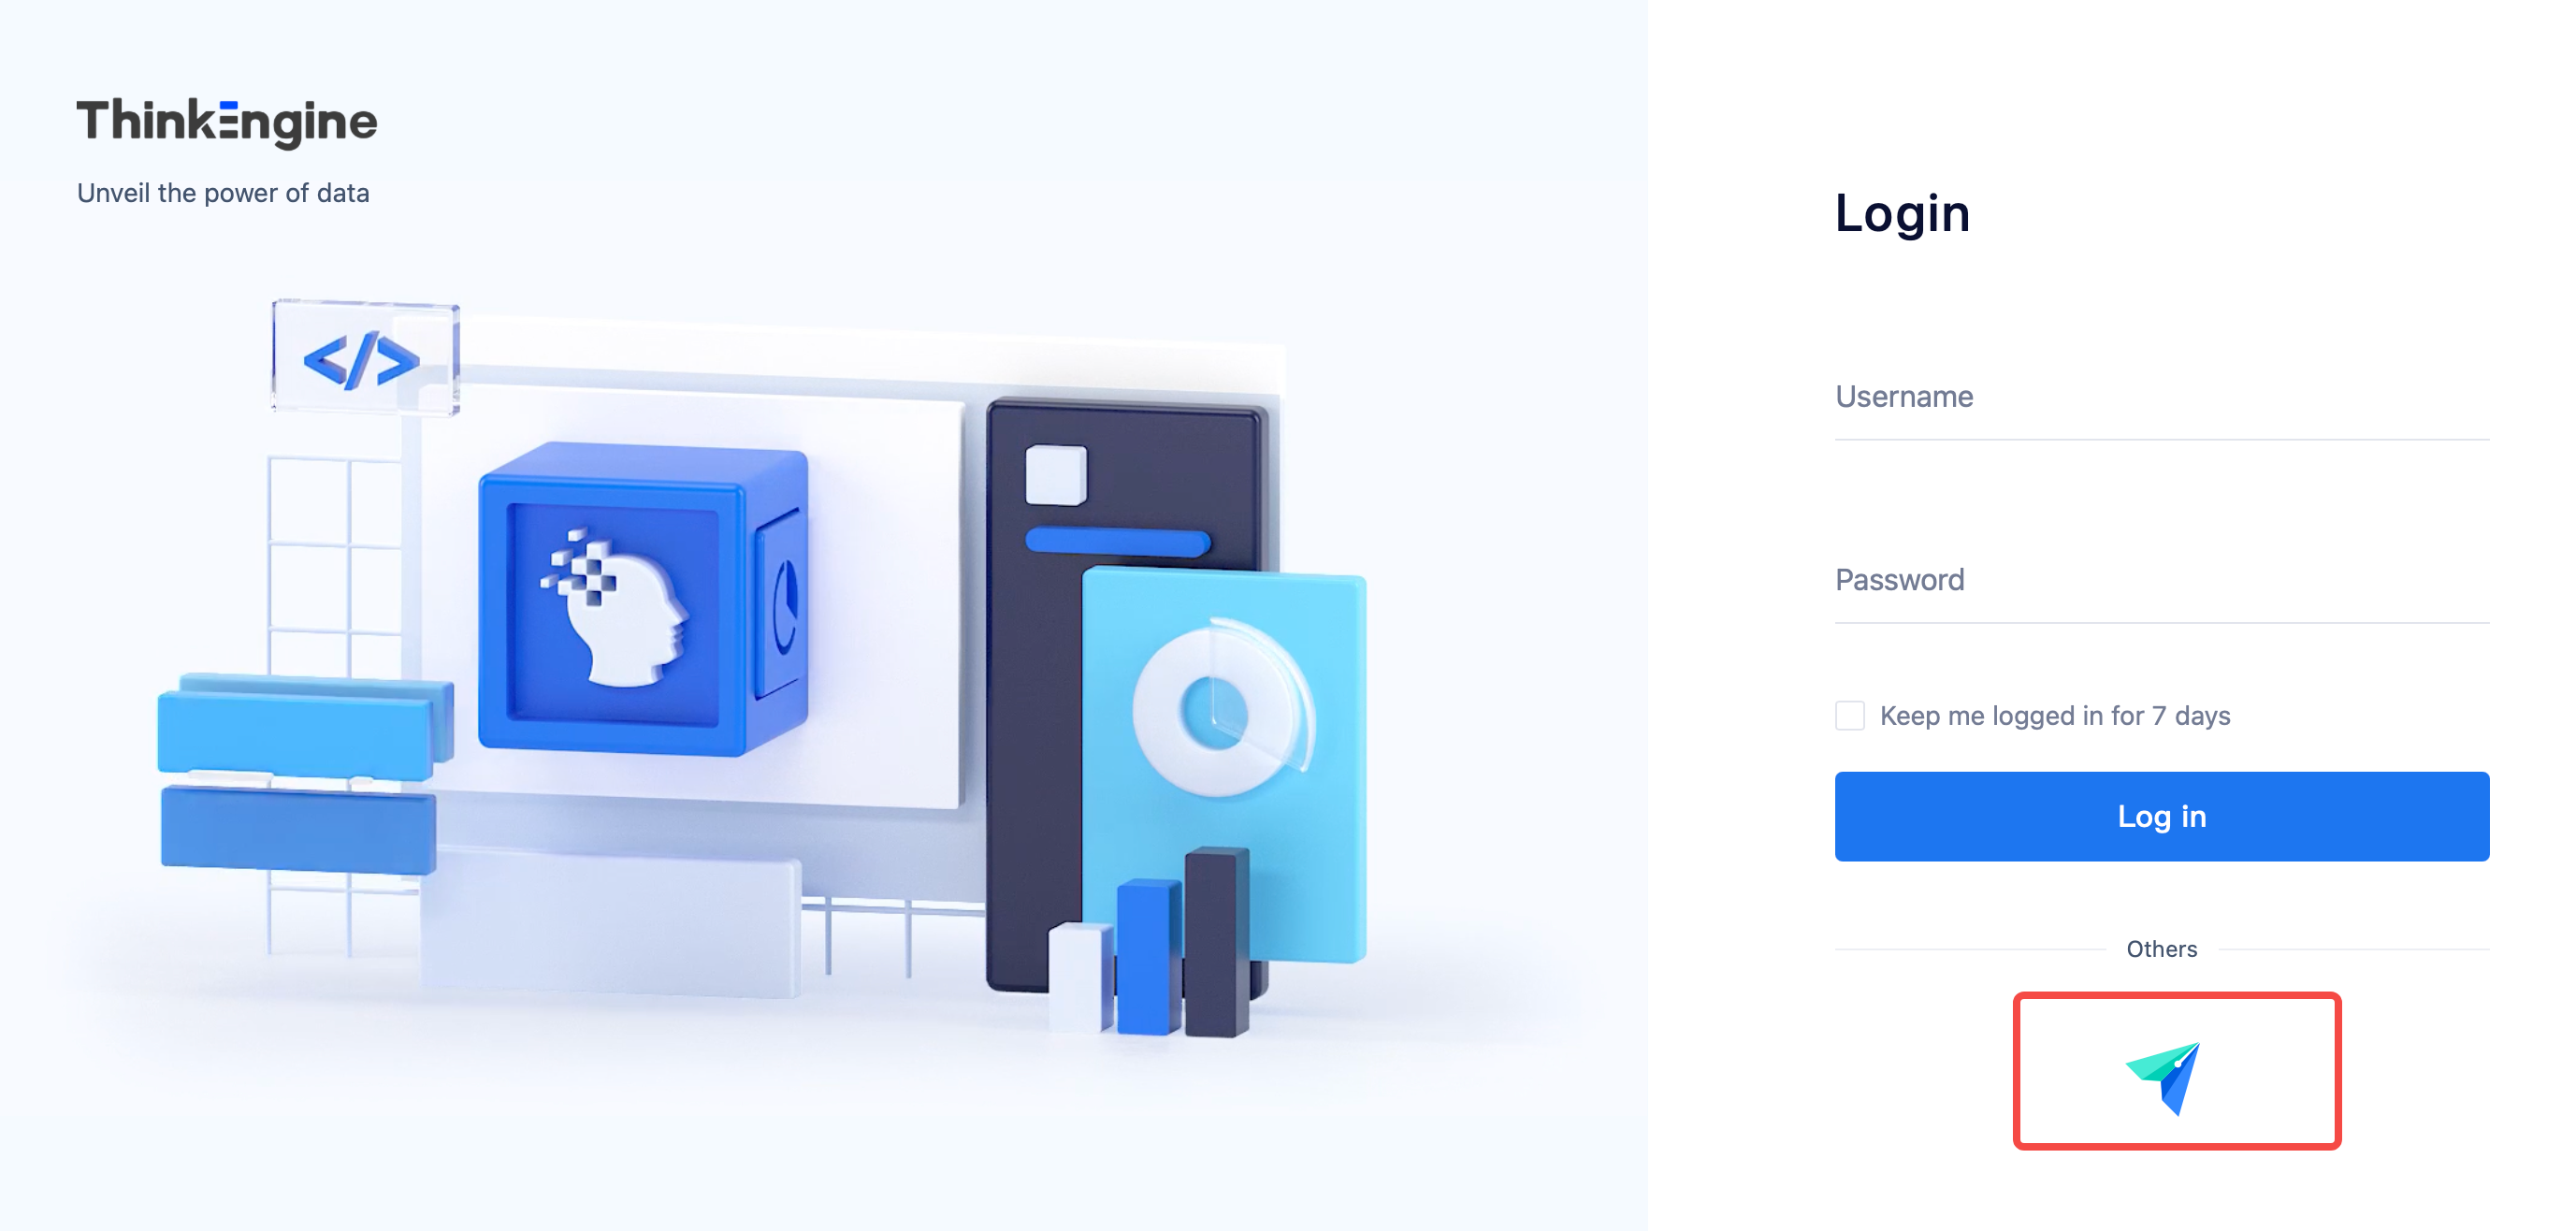
(2) Complete binding on the login page
Click the app login entry on the TE login page, input the TE account after scanning the QR code, and click binding.
# 2.2 Create a new TE account with third-party apps
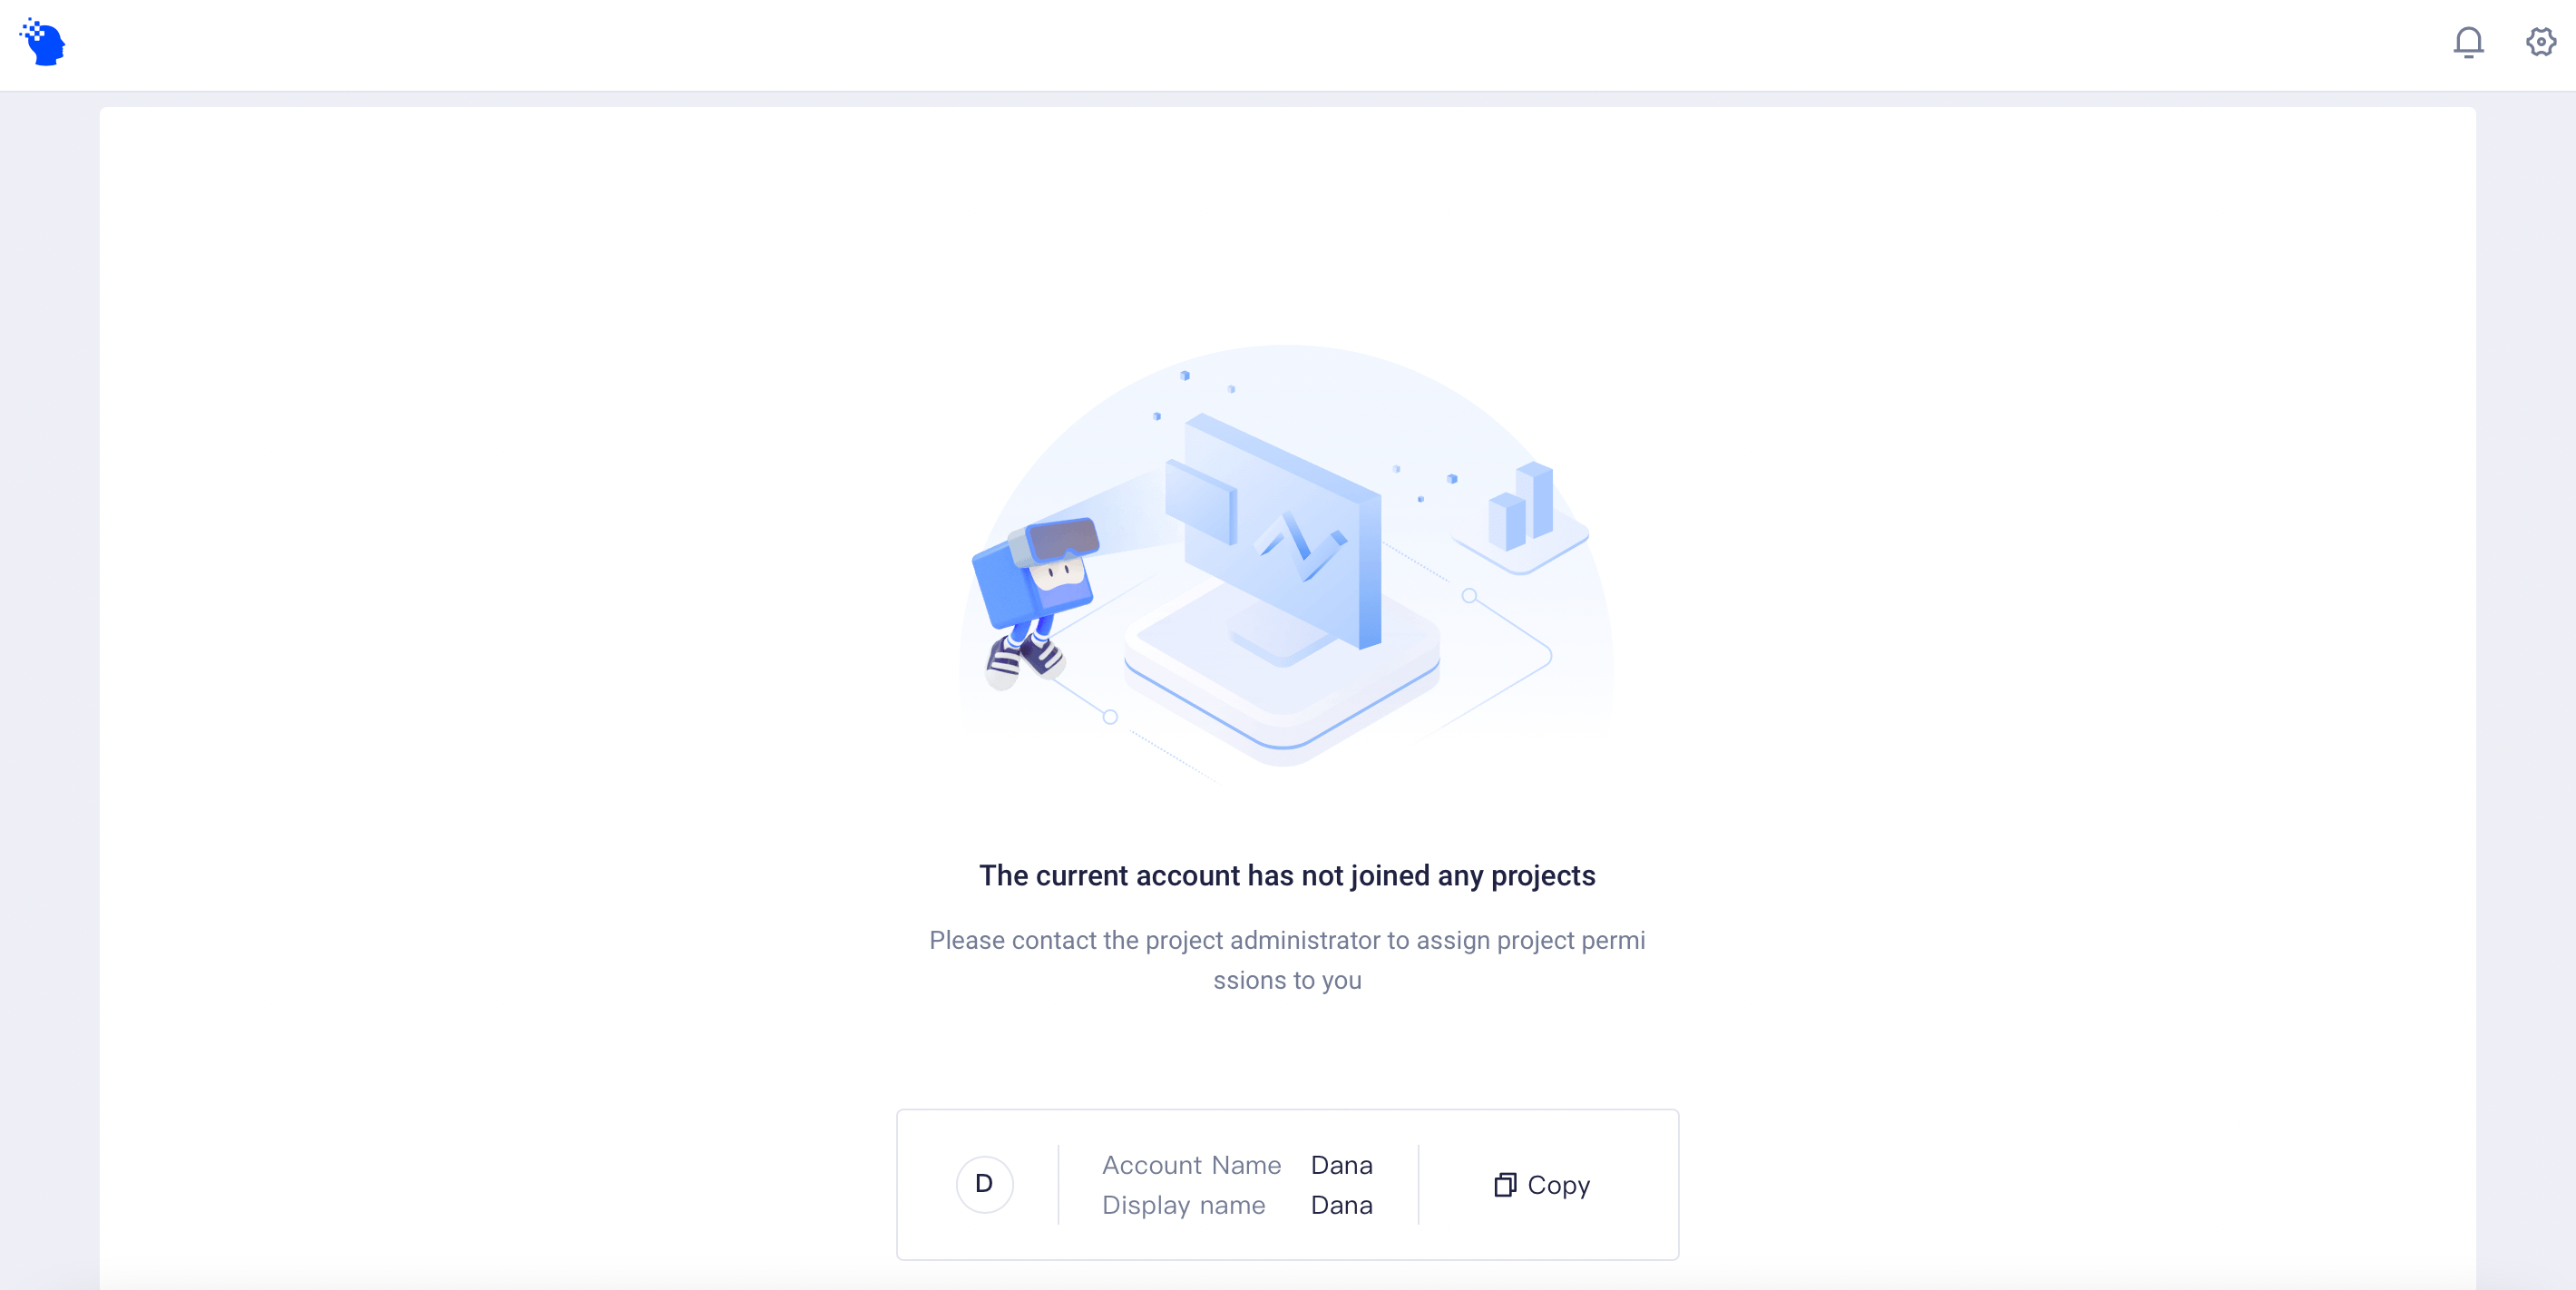
After the root admin completes the binding with third-party apps in the system management, the user could scan the QR code on the TE login page to create a TE account.
- Note: only members within the visible scope could create TE accounts.
Newly-created accounts do not have project permissions by default. The user should ask the admin to add such accounts to the project in project management to complete project authorization.
# III. Unbind Accounts
A third-party account should be bound with only one TE account. If you are prompted that the account has been bound, and want to switch the binding relationship, please unbind the current account and then rebind with a new account.
(1) Scan the QR code to log in to the bound account
(2) Enter the「personal setting」page to unbind current account 
- You can only log in to an unbound account with a TE account and password. If you plan to continue to use the account, please remember the account and password.
(3) Log in to the TE account to be bound and complete the rebinding process