# Adjust Integration Solution
This article will introduce how to integrate Adjust data with the TE background. Currently, TE background supports Adjust's Real-time callbacks (opens new window).
TIP
Please note that data generated from integrating with third-party platforms will be included in the consumed data volume of the cluster.
# Summary
| Interface | Integration Type | Data Granularity | Attribution | Cost | Revenue | Impression | Click | Conversion |
|---|---|---|---|---|---|---|---|---|
| Real-time callbacks | Callbacks | User Level | ✅ | ✅ | ✅ |
Adjust provides real-time callbacks (opens new window) for a series of events. By selecting the required data type for feedback in the Adjust background and setting the callback link of the TE system in the callback address, the feedback of user-level detailed data can be achieved.
Before integrating with Adjust's data, please ensure that you have read the TE system user identification rules and understand how TE identifies a user through #distinct_id and #account_id.
# Integration Process
- Integrate the Adjust client SDK (opens new window) and TE SDK, and set the TE user identification ID in the Adjust SDK.
- Log in to the TE background, enter the third-party integration module, add the Adjust integration, and complete the related configuration.
- Log in to the Adjust background and complete the feedback configuration.
- Check if the TE system has successfully received the data and complete the report building.
# Client SDK Configuration
The first step in integrating Adjust data is to establish the connection between the TE SDK and Adjust SDK on the client-side and set the TE system's user identification ID in the Adjust SDK.
# 1.1 Option 1 (automatic integration)
- If you are using TE SDK version 2.8.0~2.8.1, you can use this option directly.
- If you are using TE SDK version 2.8.2 and above, you also need to install a third-party data plugin. Please refer to the Android SDK integration document and iOS SDK integration document for details.
This option is an automatic integration option. Please call the following code after initializing the TE client SDK to enable it:
// Initialize the TE SDK.
ThinkingAnalyticsSDK instance = ThinkingAnalyticsSDK.sharedInstance(this, TA_APP_ID, TA_SERVER_URL);
// Enable Adjust ID association.
instance.enableThirdPartySharing(TDThirdPartyShareType.TD_ADJUST);

// Initialize the Adjust SDK.
// ...

// After registration or role creation, call login to set the account ID, and then synchronize the data again (optional).
instance.login("account_id");
instance.enableThirdPartySharing(TDThirdPartyShareType.TD_ADJUST);
TIP
If the login() or identify() method of the TE SDK is called, enableThirdPartySharing() needs to be called again to synchronize the data.
The principle of this solution is to automatically call the addSessionCallbackParameter() method of the Adjust SDK and pass the visitor ID and account ID of the TE project.
# 1.2 Option 2(manual integration)
For manual integration, you need to use the addSessionCallbackParameter() interface in the Adjust SDK to set the visitor ID and account ID of the TE project. Note that the initialization of the TE SDK must be completed before the initialization of the Adjust SDK. The following is an example of Android code:
// Initialize the TE SDK.
ThinkingAnalyticsSDK instance = ThinkingAnalyticsSDK.sharedInstance(this, TA_APP_ID, TA_SERVER_URL);

// Get the visitor ID of TE, corresponding to #distinct_id in TE.
string distinctId = ThinkingAnalyticsAPI.GetDistinctId();
// Your account ID (or role ID), corresponding to #account_id in TE.
string accountId = "{your_account_id}";

// Initialize the Adjust SDK.
// ...

Adjust.addSessionCallbackParameter("ta_distinct_id", distinctId);
Adjust.addSessionCallbackParameter("ta_account_id", accountId);
# TE Third-Party Integration Page Configuration
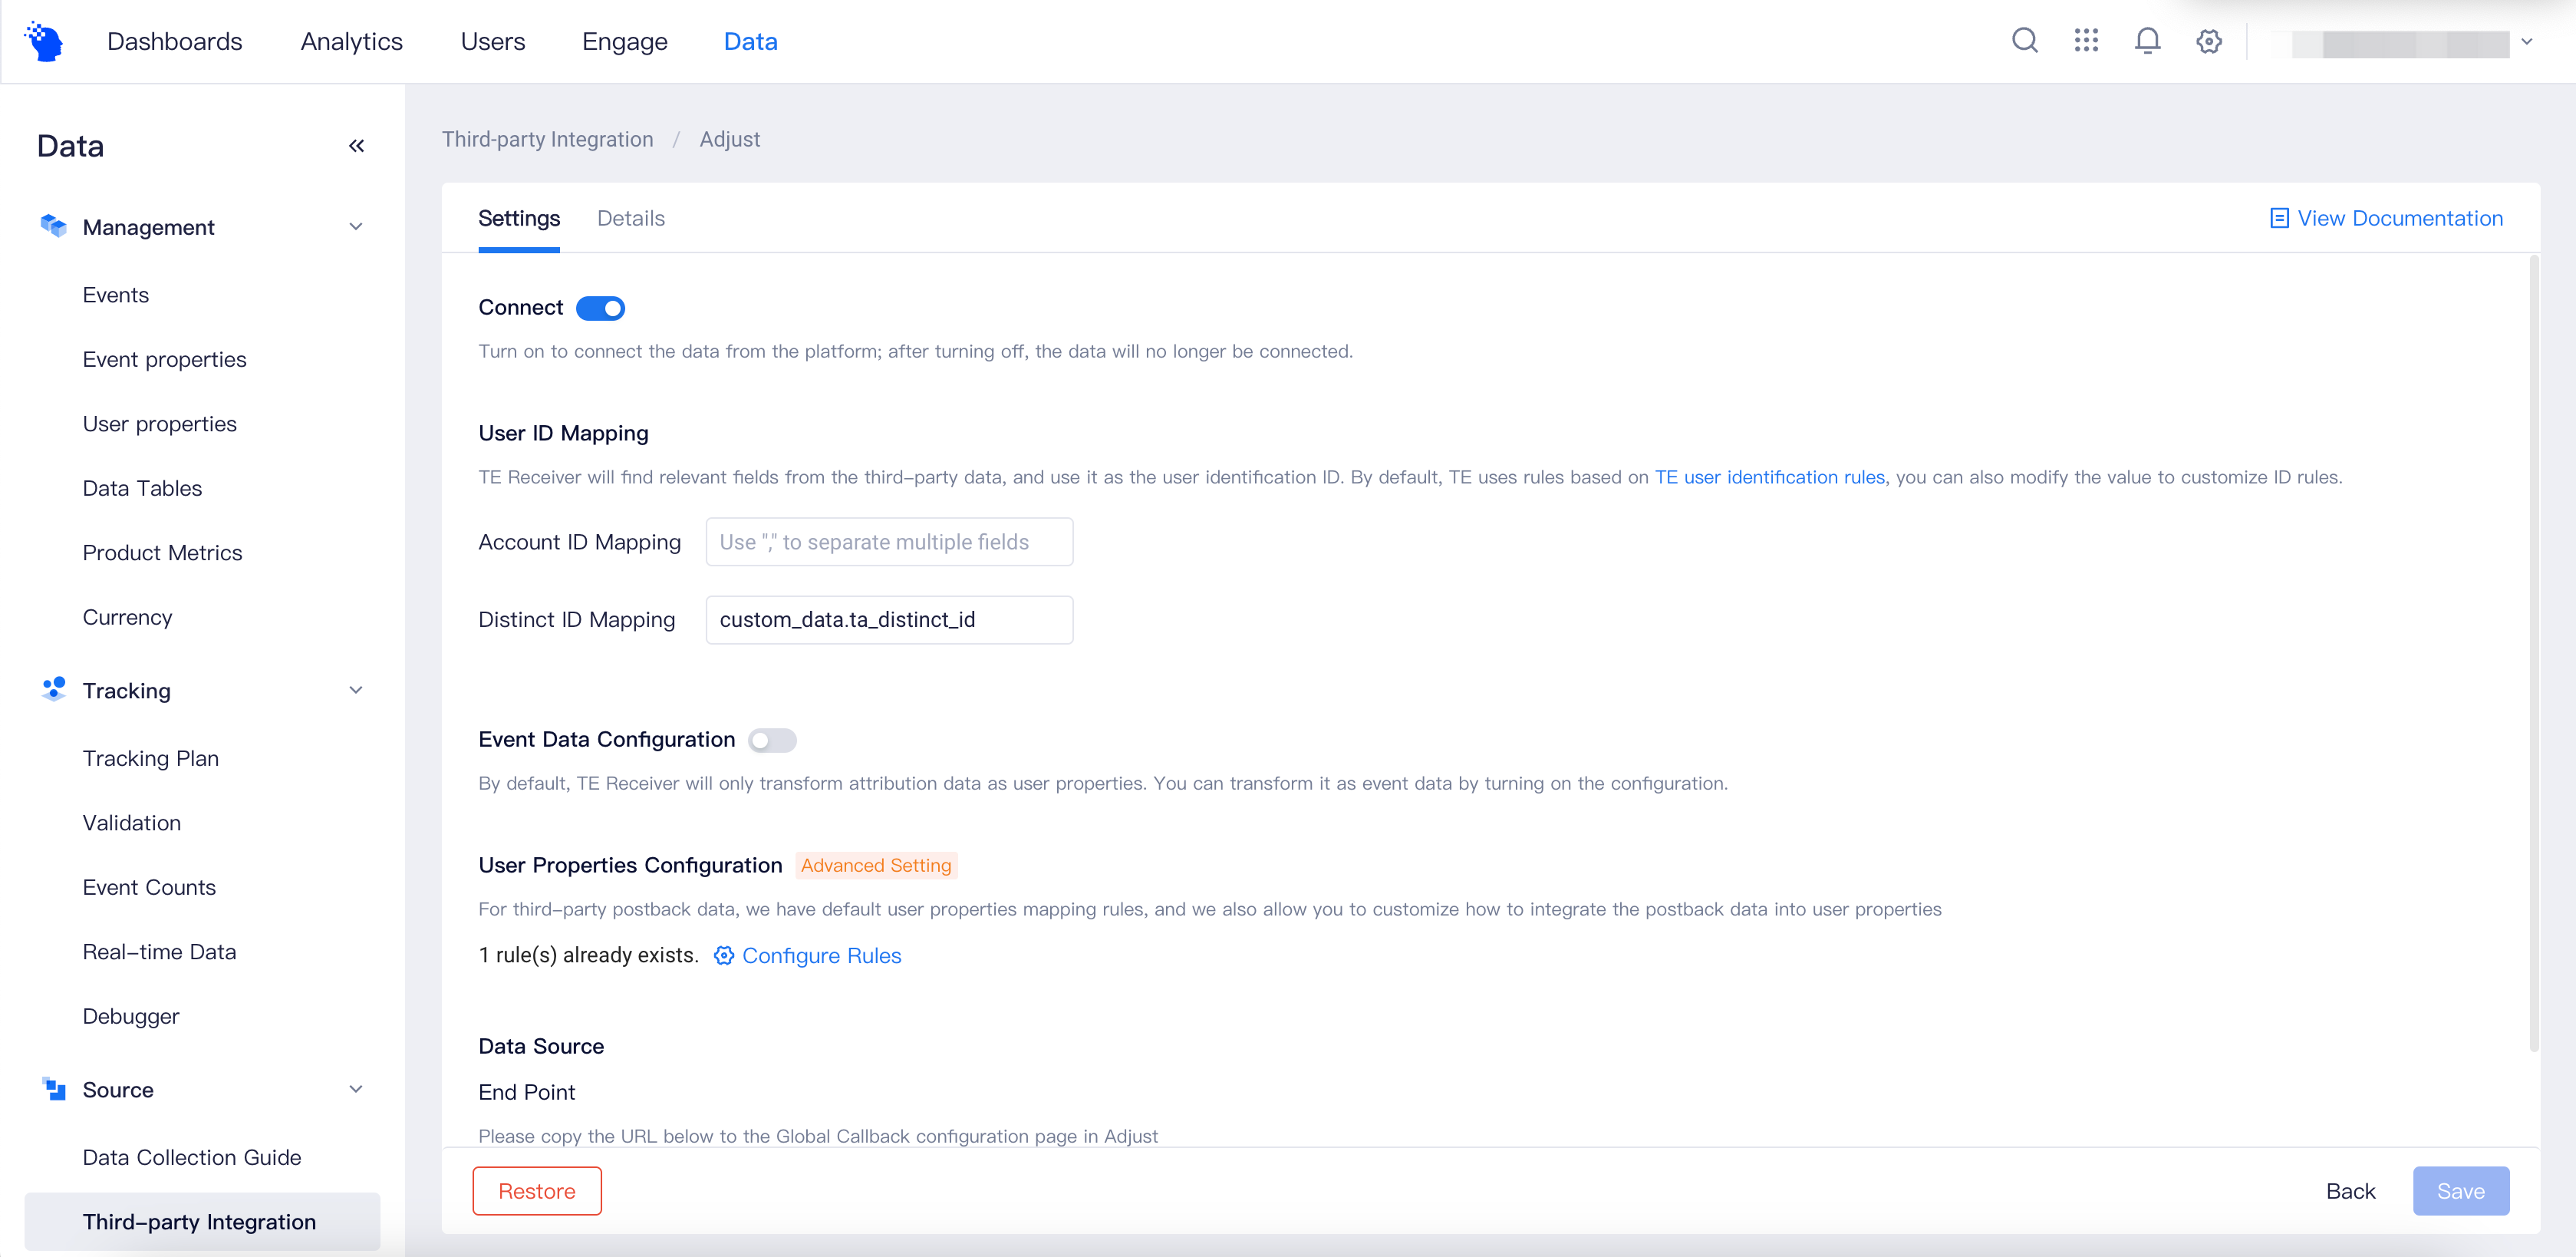
After completing the SDK configuration, you need to log in to the TE system backend and complete the configuration of Adjust in the "Third-Party Integration" module. The following figure shows the configuration page of Adjust. Please open the "Connect" to start the configuration of Adjust:
# 2.1 User ID Mapping
Since Adjust returns user-level data, it needs to set user identification rules, that is, the fields corresponding to #distinct_id and #account_id in the returned data. Based on this configuration, the TE system sets these fields as user identification fields when converting the returned data.
If you have followed the client SDK configuration in this document, you can use the default values directly:
- Account ID Mapping: ta_account_id
- Distinct ID Mapping: ta_distinct_id

# 2.2 Event Data Configuration
After opening the "Event Table Storage Settings" switch, all data returned by Adjust will be written to the event table. We recommend that you enable event data storage. 
# 2.3 User Properties Configuration
By default, the TE system automatically writes the attribution fields in the data returned by Adjust to the standardized user attributes. The following are the fields and their meanings that are written to the user attributes:
| Adjust Fields | Standardized Field | Explanation |
|---|---|---|
| network_name | te_ads_object.media_source | Media Source |
| campaign_name | te_ads_object.campaign_name | Campaign Name |
| adgroup_name | te_ads_object.ad_group_name | Adset Name |
| creative_name | te_ads_object.ad_name | Ad Name |
TIP
The default rules for storing user attributes in the old version are not consistent with the current rules, so please be aware of the differences. If you need to merge the old and new attributes, you can use the virtual property feature.
If you need to make changes, you can click "Configure Rules" to enter the rule configuration page, as shown below.
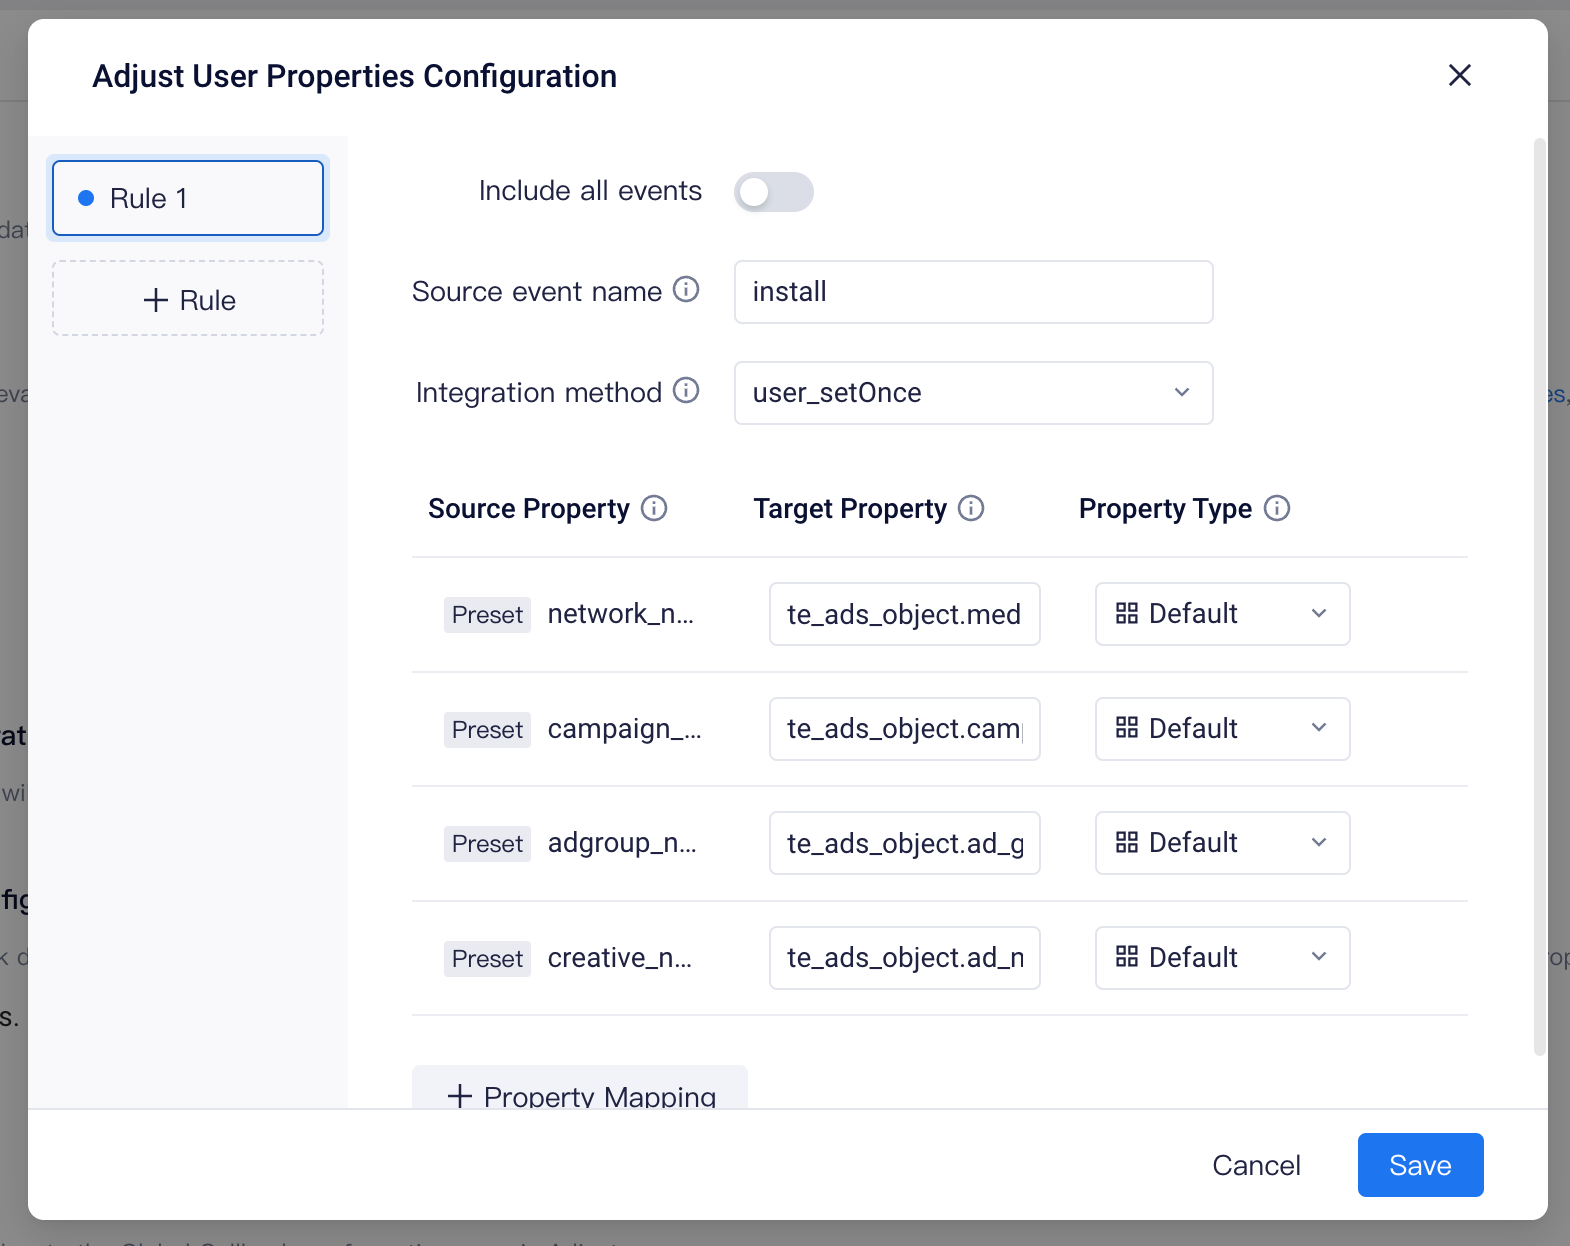
Here, you can modify which events the user attributes come from. If you don't want user attributes to be written frequently, you can turn off "Include All Events" and change the source event name to "installs." With this configuration, the TE system will only extract the fields that need to be written to user attributes from the installs event returned by Adjust and write them into the database. The default storage method is "user_setOnce," which means that only the information reported for the first time will be retained.
You can click the "Attribute Mapping" button to add fields that need to be written to user attributes. You can also click the "Rule" button on the left to add a new set of rules. For example, if you want to extract ad revenue from monetization data returned by Adjust and write it to user attributes in a "user_add" way to record the accumulated ad revenue of each user.
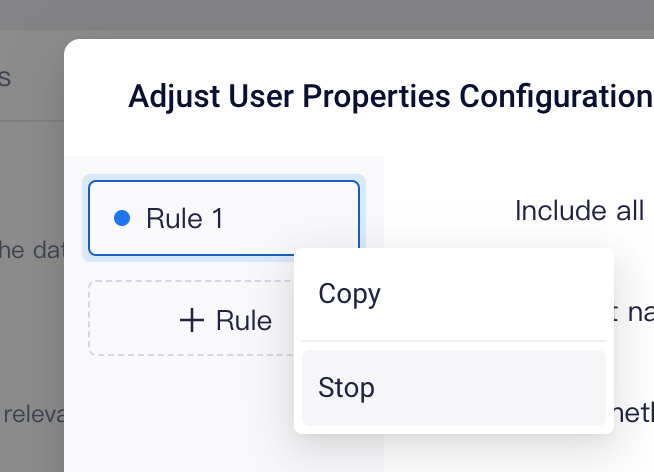
If you want to turn off user attribute storage, you can stop all rules:
# 2.4 Data Source
# 2.4.1 Default Configuration
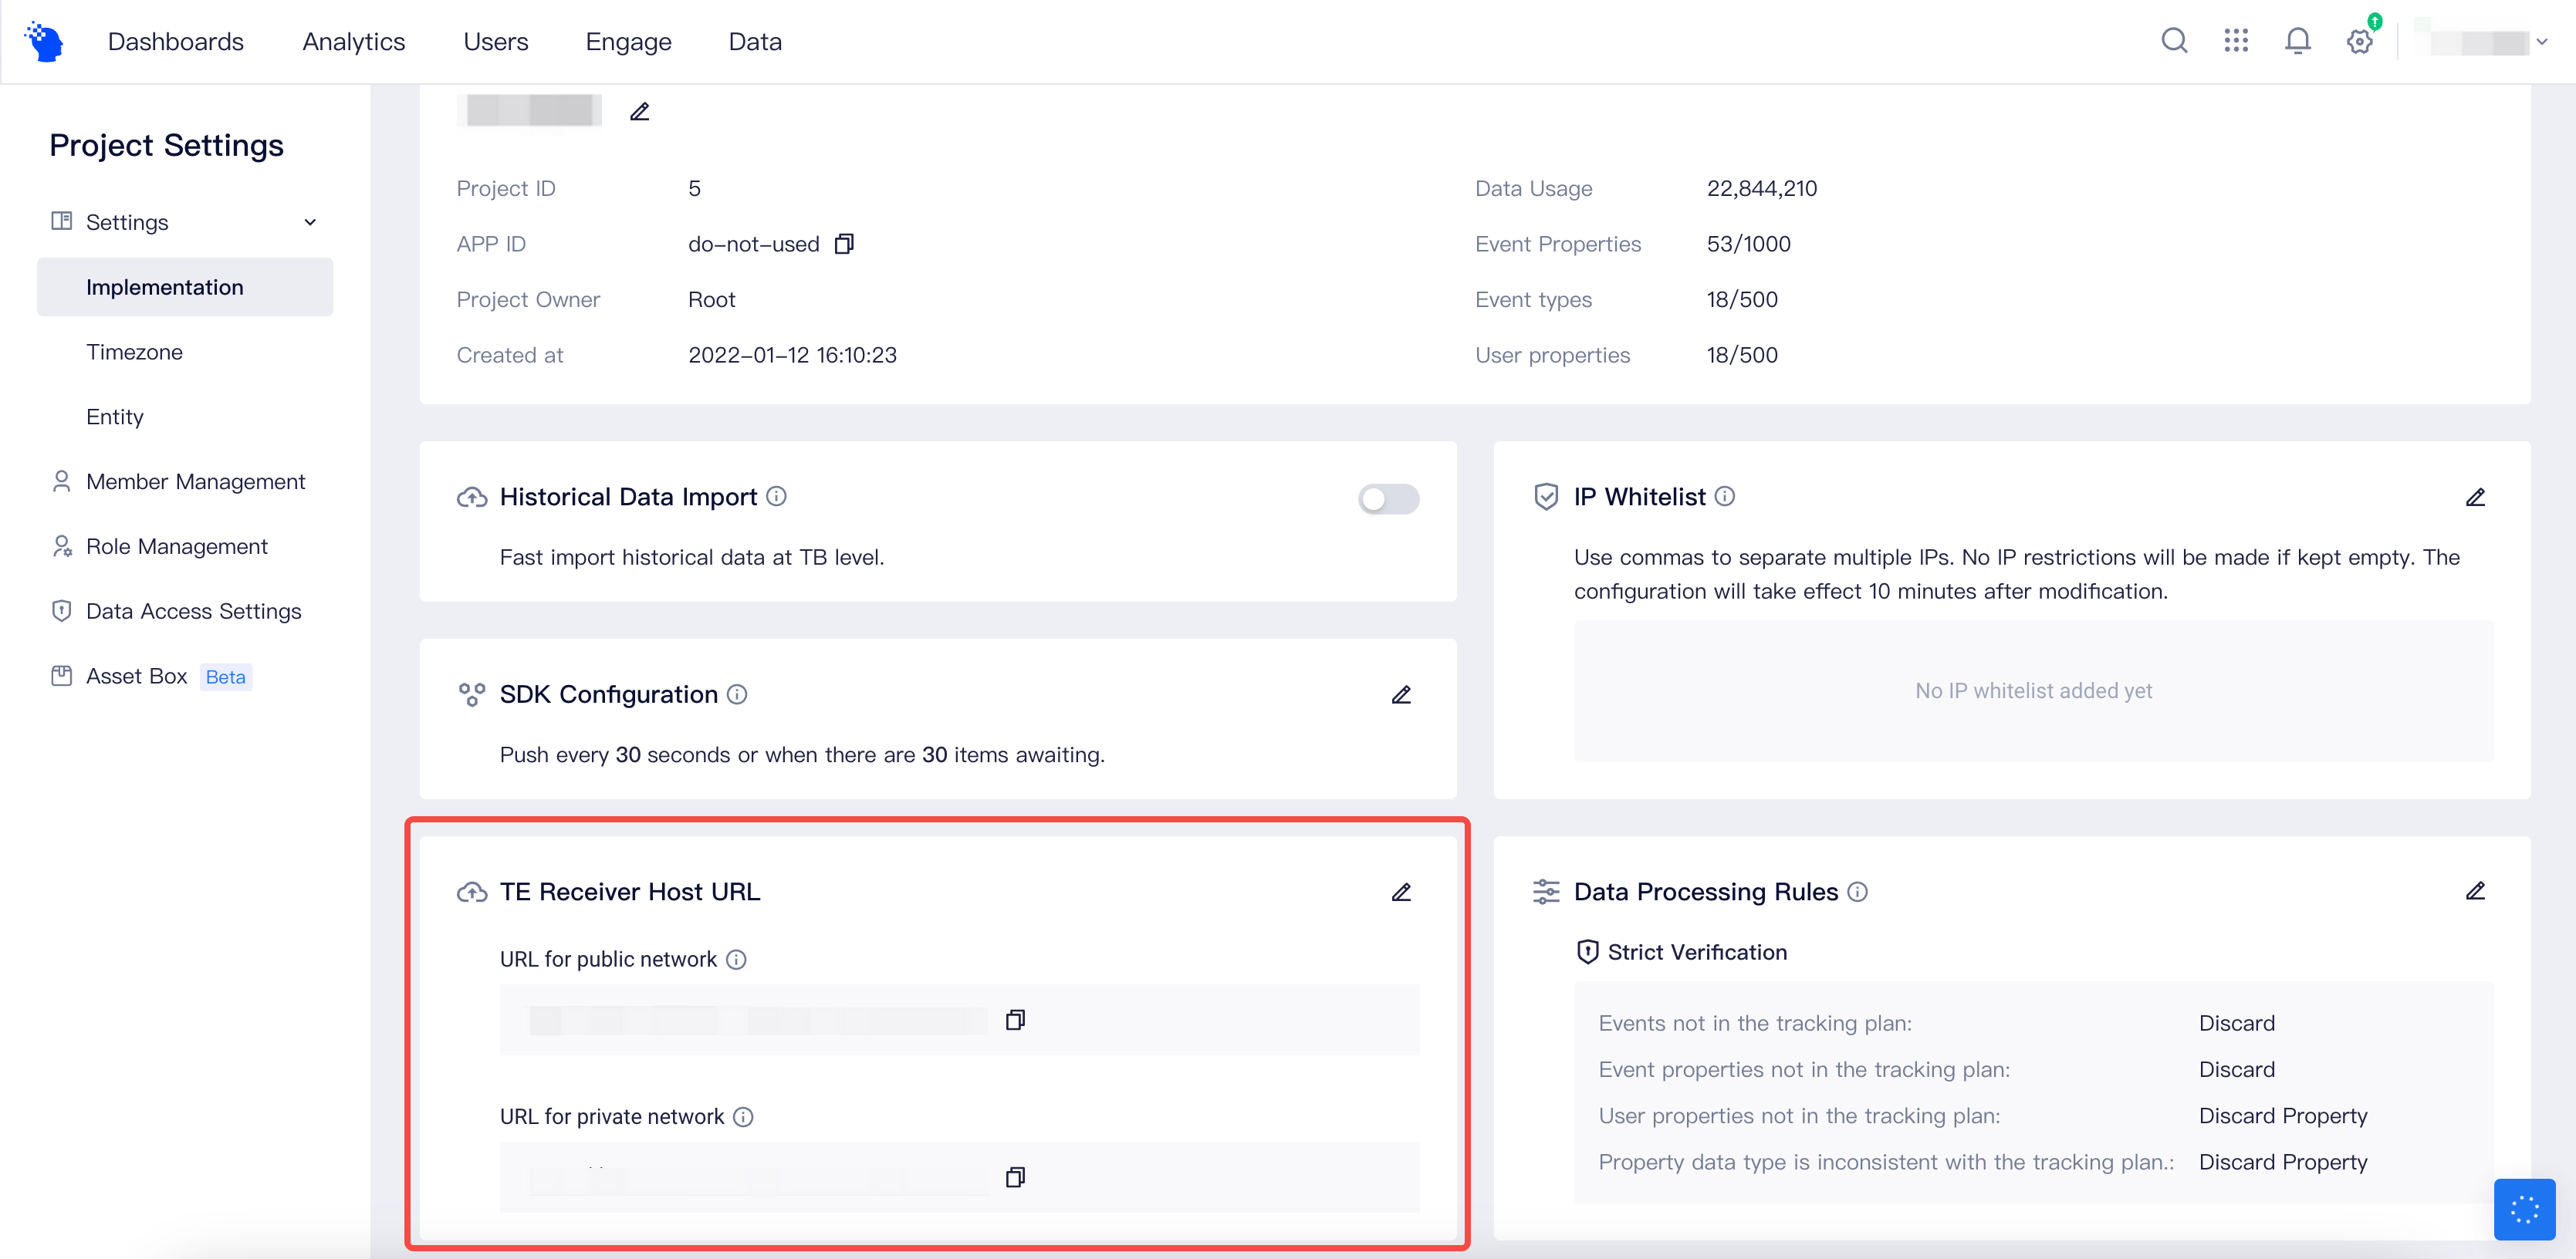
If you have configured the system-level and project-level data reporting addresses, the following link will be displayed. You can directly copy the address and paste it into the real-time callback configuration of Adjust:

If there is no address displayed here, please go to the "Project Settings"-"Access Configuration"-"Data Reporting Address" in the upper right corner menu to configure the public network address. This address is the data reporting address configured in the TE SDK. After the configuration is completed, go back to the Adjust configuration page and copy the terminal address in the "Data Source" section.
# 2.4.1 Custom Macros
Adjust's callback address contains a structure called macros, which is represented by {macro}. Macros can be thought of as placeholders. When the data that Adjust needs to return contains the field corresponding to the macro, such as {campaign_name}, Adjust will fill in the value of the campaign_name in the callback address at the location where the macro is located. You can refer to Adjust's callback demo video (opens new window) to understand the role of macros.
The following is the recommended address on the TE interface for you to copy. Please note that you need to replace the following contents in the address:
- {receiver-host}: Data reporting address, that is, the public network address in the TE background "Project Management"-"Access Configuration"-"Data Reporting Address".
- {app-id}: TE project APP ID.
In addition, if you have other parameters that you want to add, you can refer to this document (opens new window):
https://{receiver-host}/attribution/callback/adjust/{app-id}?network_name={network_name}&campaign_name={campaign_name}&adgroup_name={adgroup_name}&creative_name={creative_name}&activity_kind={activity_kind}&created_at_milli={created_at_milli}&timezone={timezone}&event_name={event_name}&cost_amount={cost_amount}&cost_currency={cost_currency}&publisher_parameters={publisher_parameters}&app_id={app_id}&app_name={app_name}&country={country}&os_name={os_name}
TIP
The old version of the data source address is not consistent with the current version, so please be aware of the differences. We recommend that you use the new address.
# Configuration of Adjust's Callback
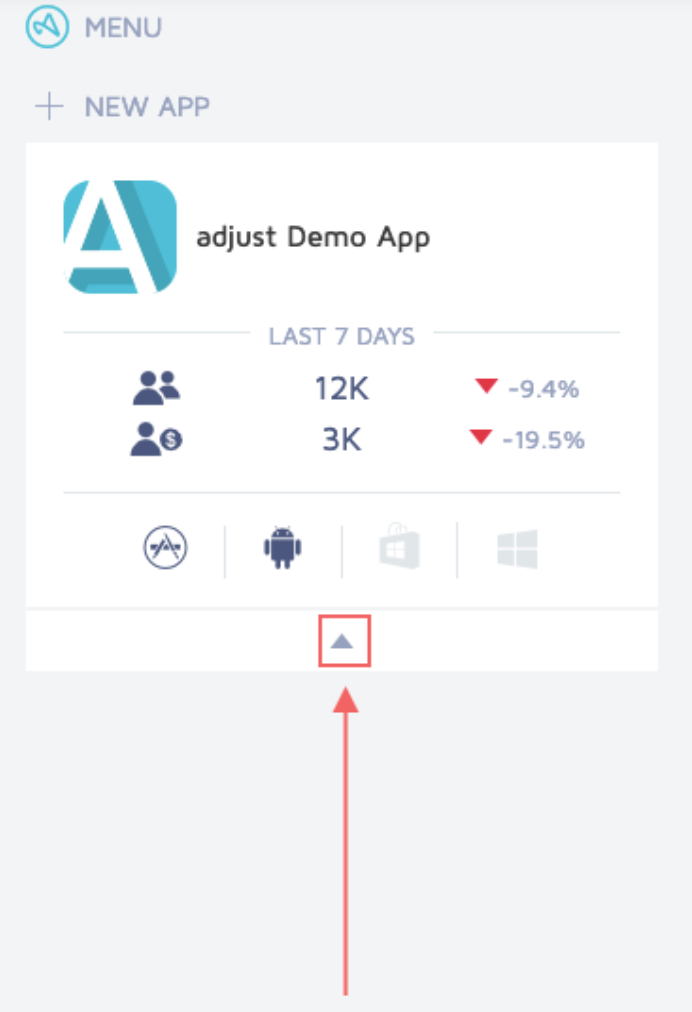
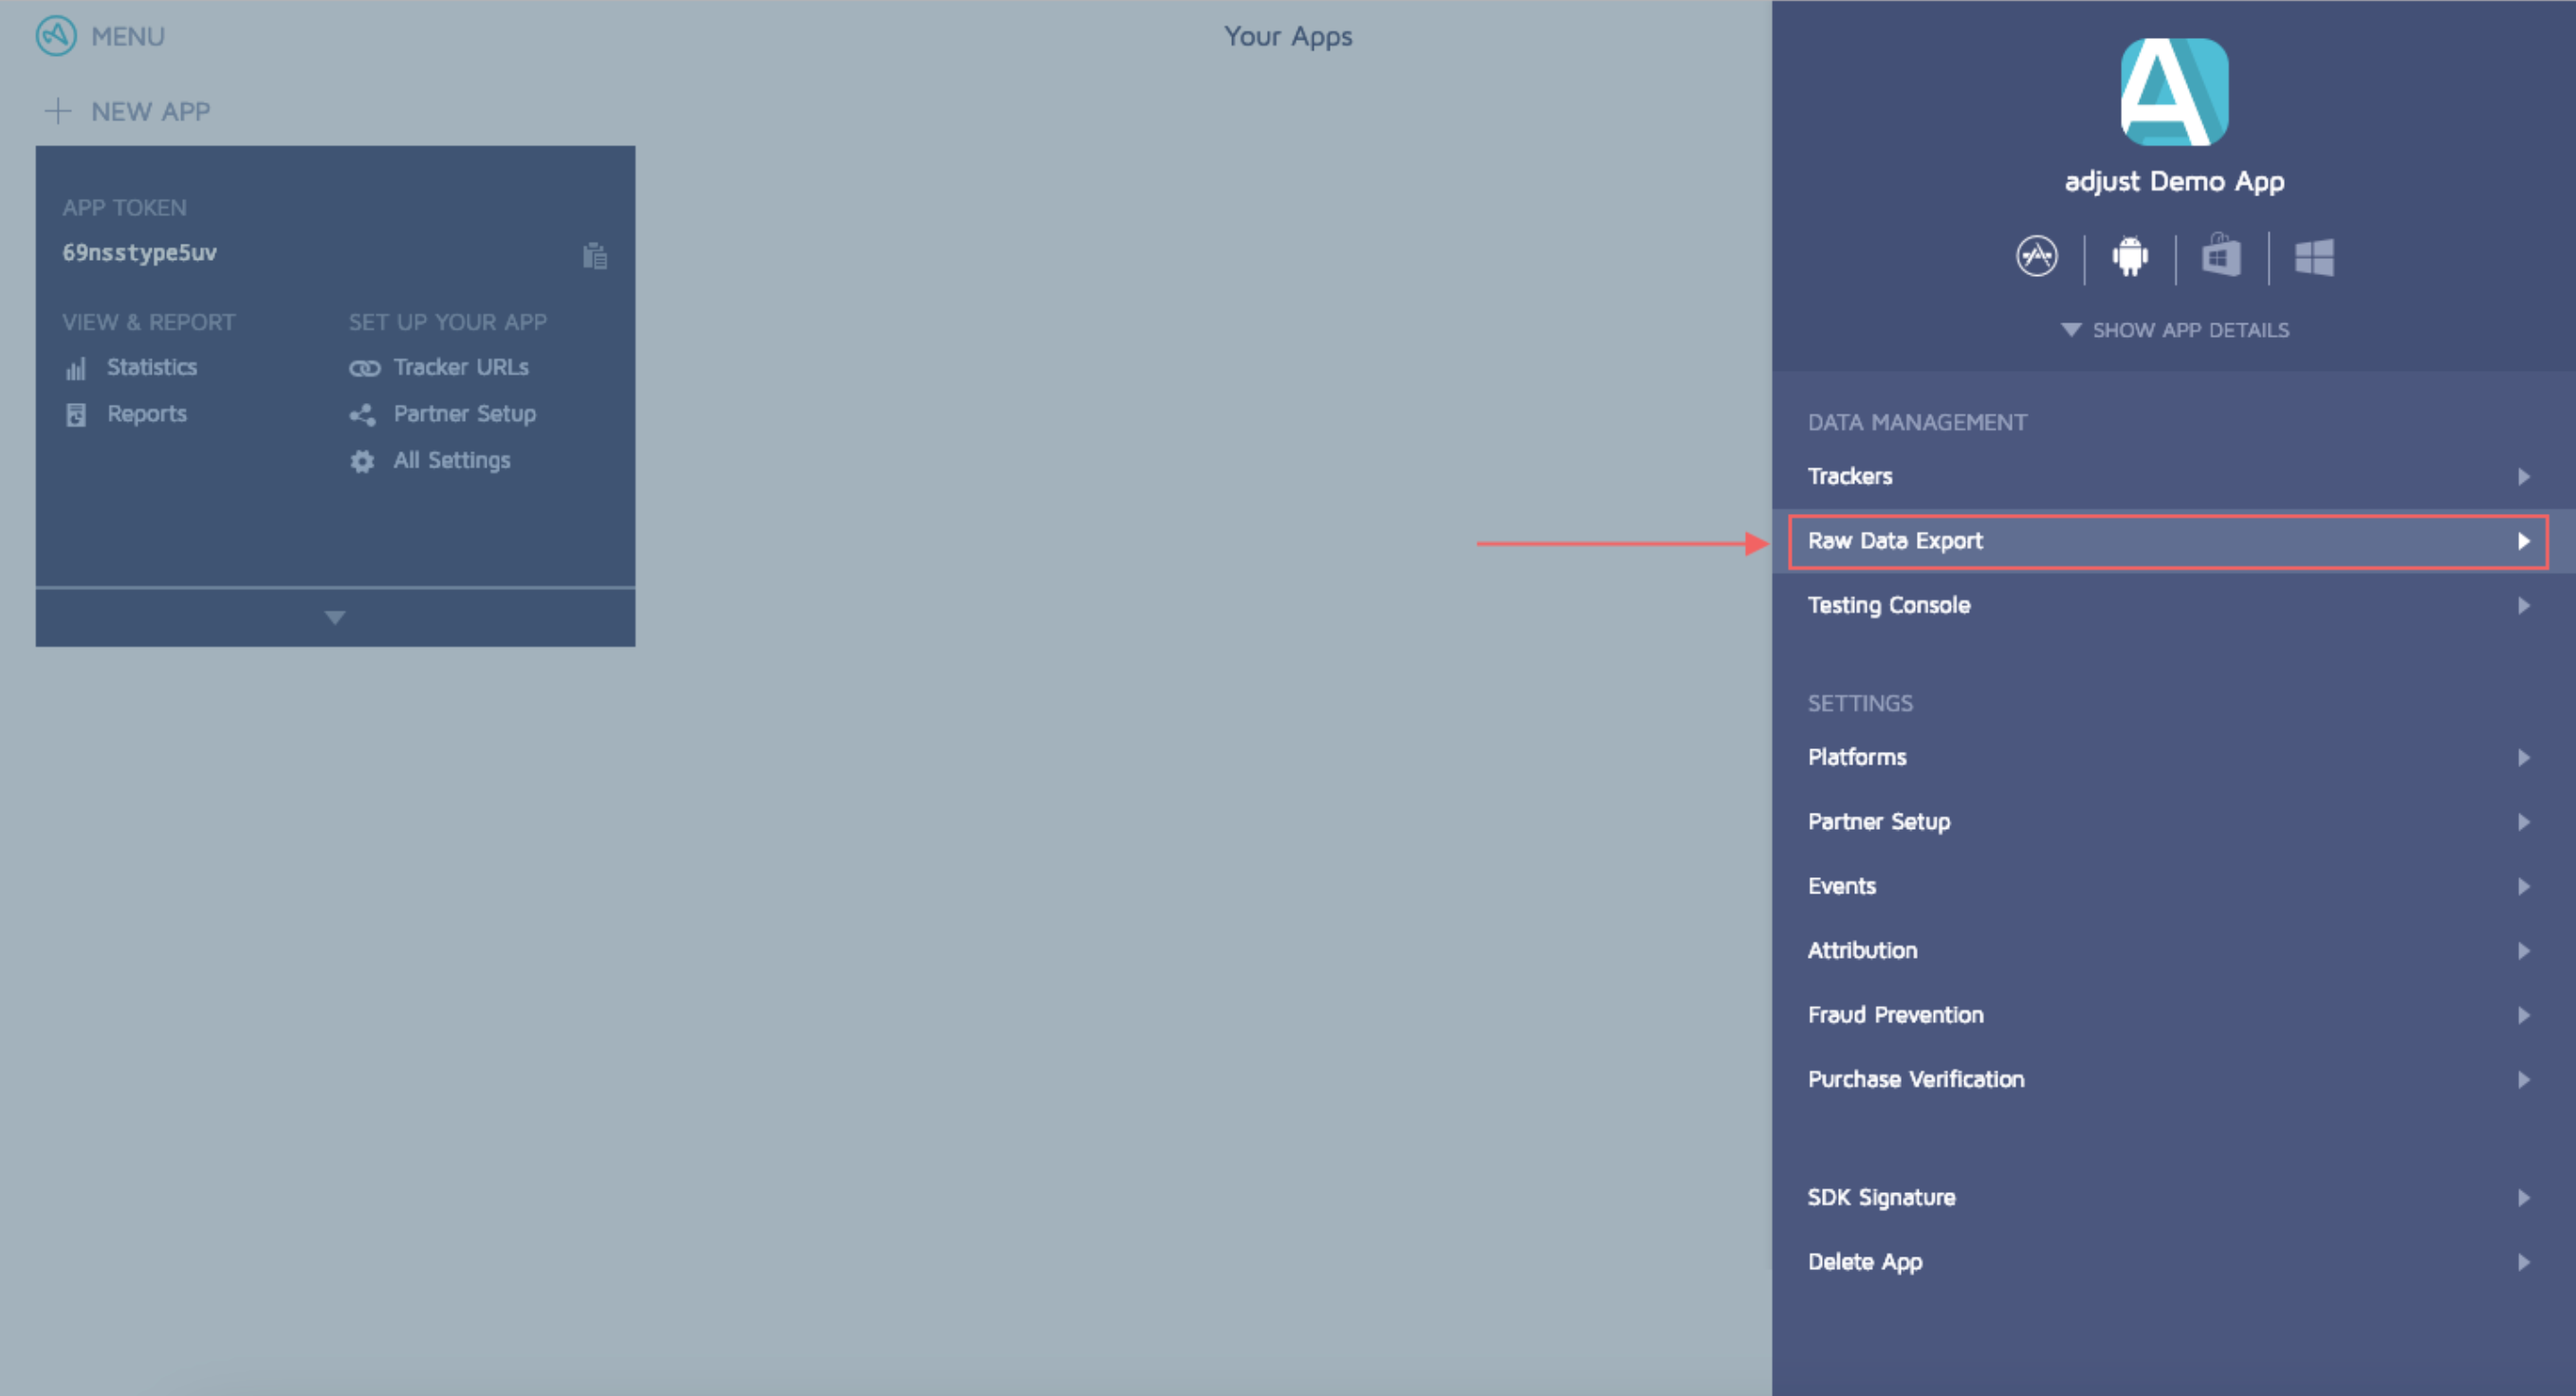
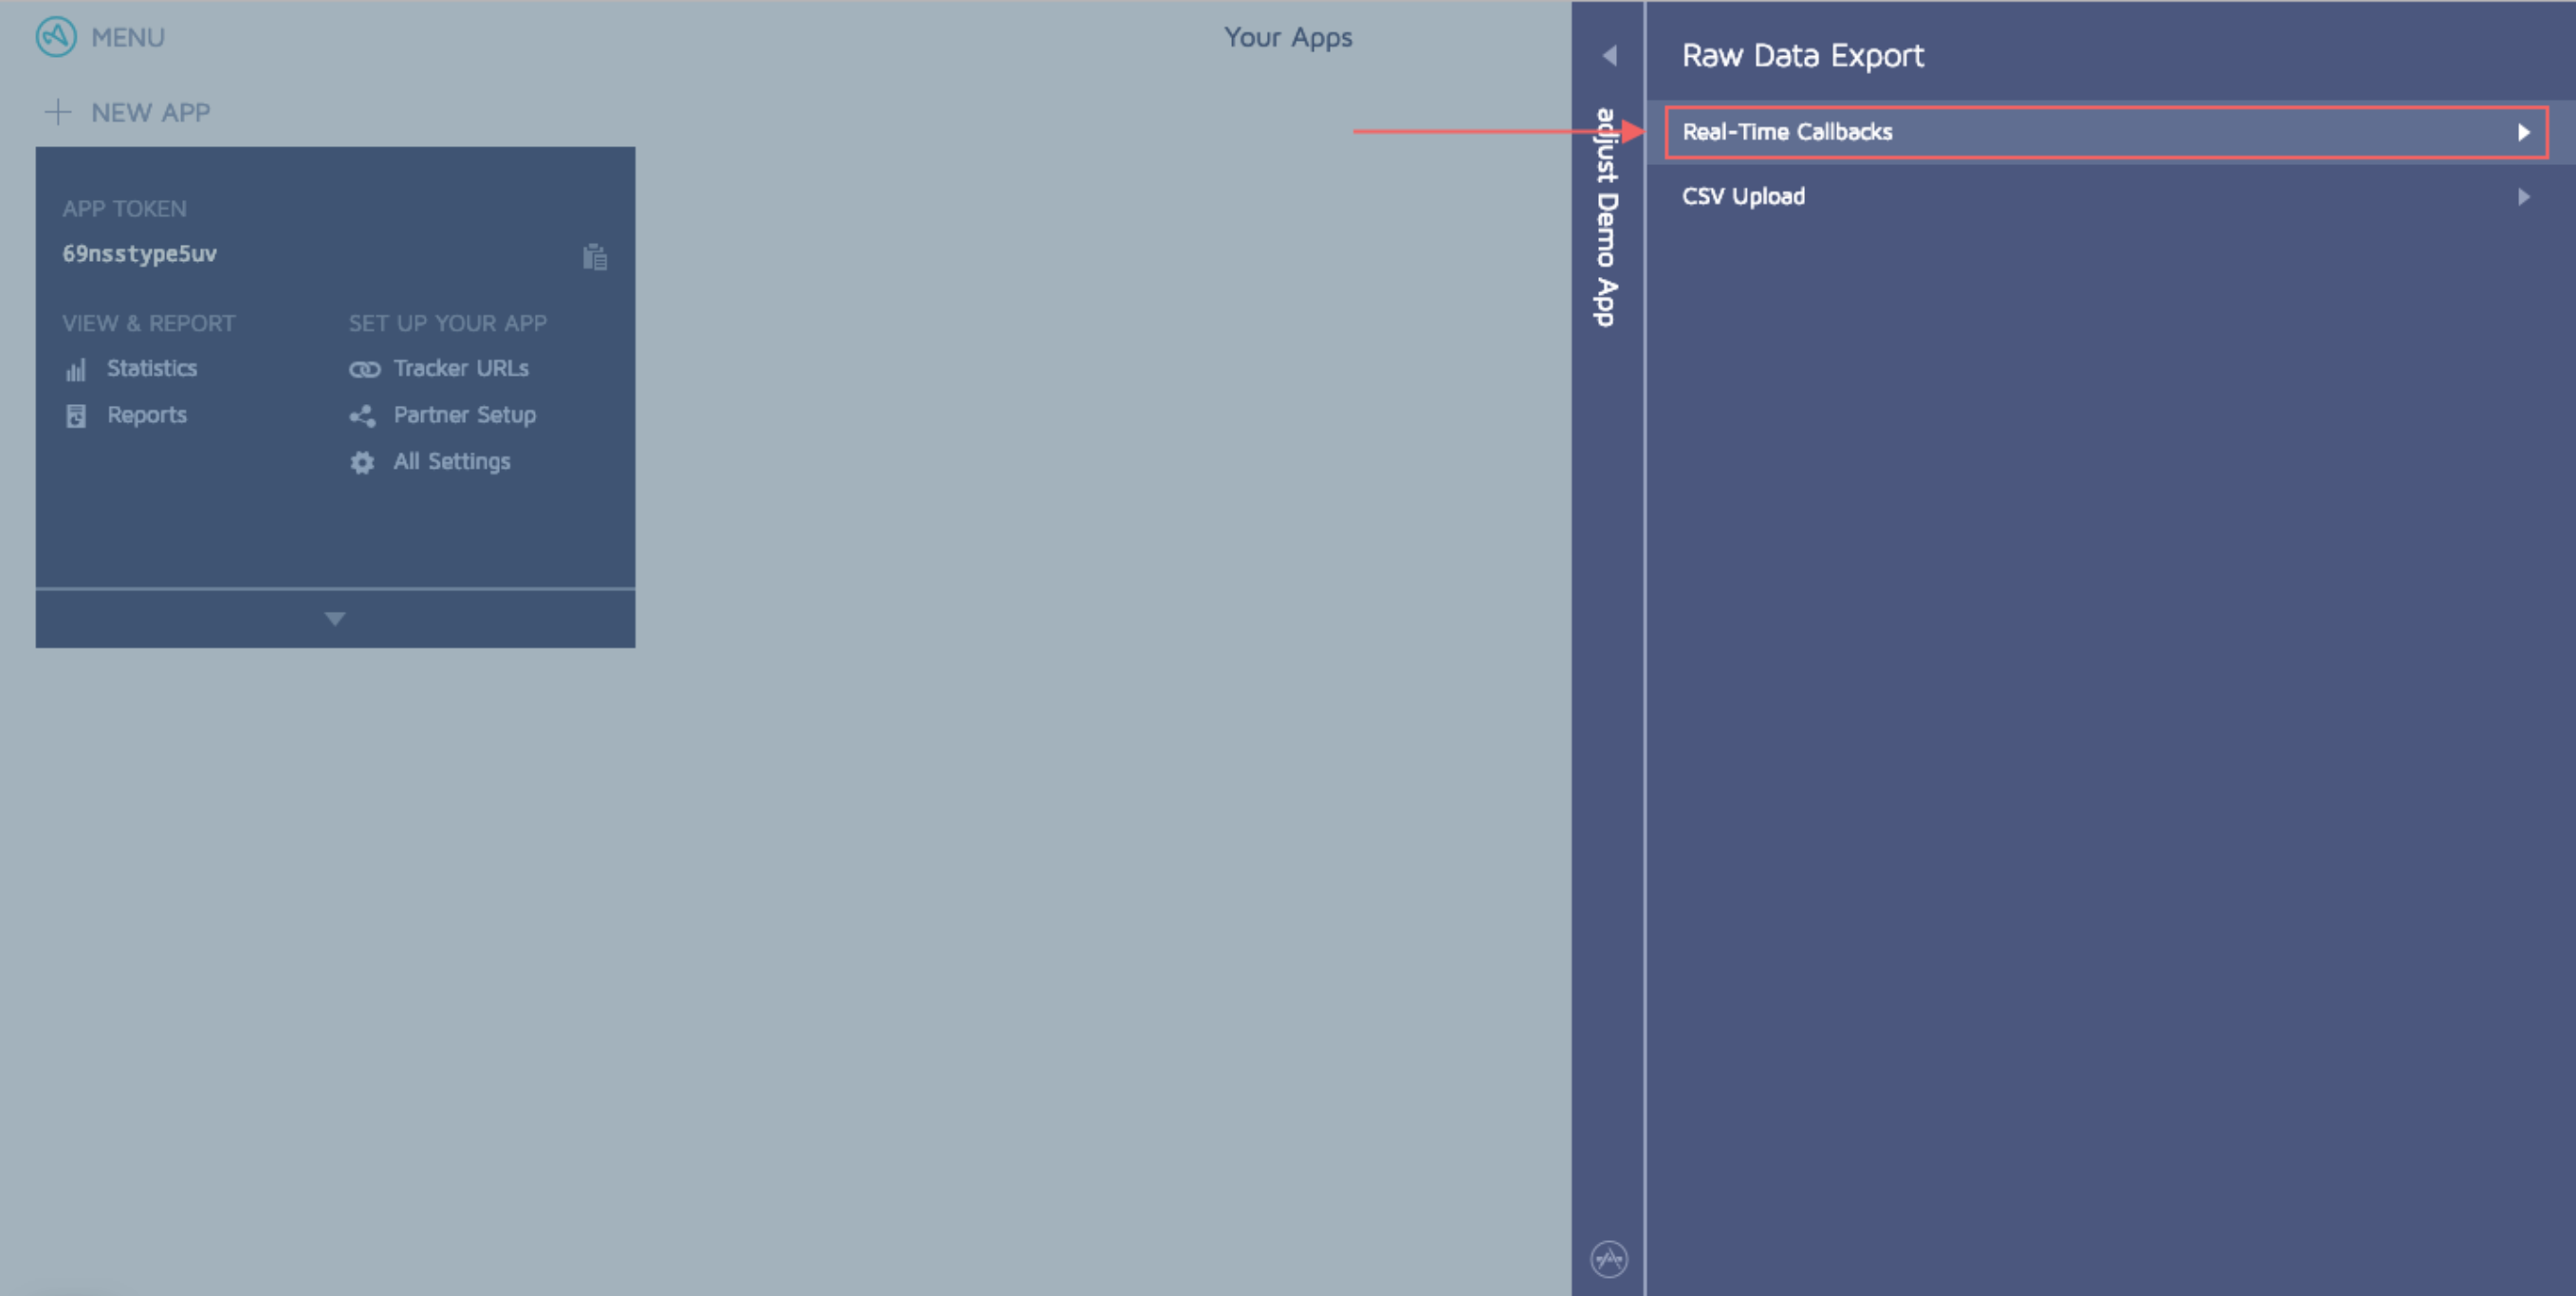
After completing the configuration in the TE background, log in to the Adjust backend using an administrator account. On the application page, click the insertion symbol, select "All Settings"-"Raw Data Export"-"Real-Time Callback" to enter the callback configuration page.
Adjust supports configuring global callbacks (opens new window), as well as configuring single activity callbacks (opens new window). After evaluating all the callback events, we recommend that you configure single activity callbacks for the install and ad revenue events. The following are the events that we suggest you configure:
| Event Name |
|---|
| Install |
| Ad Revenue (Ad Revenue Plan) |
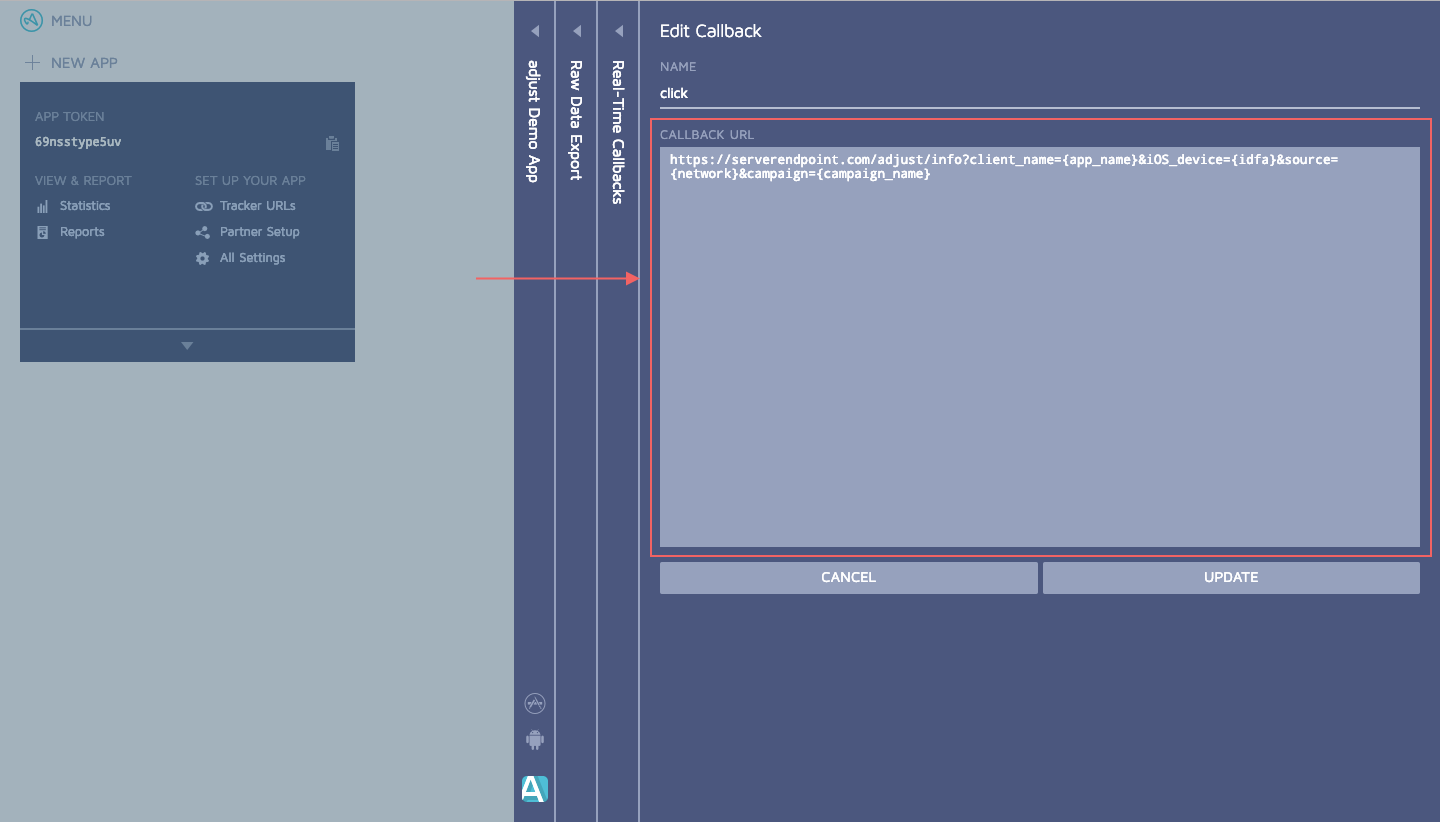
The callback for the install event can directly use the data source address of the third-party integrated page.
For the ad revenue event, we recommend using the following address:
https://{receiver-host}/attribution/callback/adjust/{app-id}?network_name={network_name}&campaign_name={campaign_name}&adgroup_name={adgroup_name}&creative_name={creative_name}&activity_kind={activity_kind}&created_at_milli={created_at_milli}&timezone={timezone}&event_name={event_name}&cost_amount={cost_amount}&cost_currency={cost_currency}&publisher_parameters={publisher_parameters}&app_id={app_id}&app_name={app_name}&country={country}&os_name={os_name}¤cy={currency}&revenue={revenue_float}&placement={ad_revenue_placement}&ad_revenue_unit={ad_revenue_unit}&ad_revenue_network={ad_revenue_network}
Please set them sequentially to the install callback address and ad revenue callback address:
# Data Storage Logic
# 4.1 User Identification Rules
TE system will identify the user based on the configuration in "User ID Mapping" and associate the granular data returned by Adjust with the corresponding user in the TE project.
The default rules are:
- Account ID: Check whether ta_account_id exists in the callback data. If it does, set it as #account_id. Otherwise, leave it blank.
- Distinct ID: Check whether ta_distinct_id exists in the callback data. If it does, set it as #distinct_id. Otherwise, leave it blank.
- If both Account ID and Distinct ID are blank, the data will be treated as invalid and discarded directly.
# 4.2 Event Storage Rules
- Use the created_at_milli field in the data as #event_time for the event. If created_at_milli does not exist, take the value of created_at as #event_time.
- The event name in the data is the Adjust event name with the prefix of "adjust_" (e.g., the installs event will be stored as adjust_installs).
- Other fields configured in the callback link will be stored in full.
# 4.3 Standardized Fields
The following event properties will be standardized:
| Original Field | Standardized Field | Meaning |
|---|---|---|
| network_name | te_ads_object.media_source | Media channel |
| ad_mediation_platform | te_ads_object.media_source | Monetization channel |
| campaign_name | te_ads_object.campaign_name | Ad plan name |
| google_ads_campaign_name | te_ads_object.campaign_name | Ad plan name (Google Ads data only) |
| google_ads_campaign_id | te_ads_object.campaign_id | Ad plan ID (Google Ads data only) |
| adgroup_name | te_ads_object.ad_group_name | Ad group name |
| google_ads_adgroup_name | te_ads_object.ad_group_name | Ad group name (Google Ads data only) |
| google_ads_adgroup_id | te_ads_object.ad_group_id | Ad group ID (Google Ads data only) |
| creative_name | te_ads_object.ad_name | Ad name |
| google_ads_creative_id | te_ads_object.ad_id | Ad ID (Google Ads data only) |
| ad_revenue_placement | te_ads_object.placement | Monetization ad position |
| google_ads_placement | te_ads_object.placement | Ad position (Google Ads data only) |
| cost_amount | te_ads_object.cost | Cost per impression |
| cost_currency | te_ads_object.currency | Currency of the cost per impression for buying traffic |
| revenue_usd | te_ads_object.revenue | Monetized revenue |
| constant value: USD | te_ads_object.currency | Currency of the monetized revenue |
| country | te_ads_object.country | Country/region code |
| os_name | te_ads_object.platform | Platform, i.e., Android, iOS, etc. |
| app_id | te_ads_object.app_id | App ID |
| app_name | te_ads_object.app_name | App name |
# 4.4 User Properties Storage Rules
- Associate the event data with the corresponding TE user based on the user identification rules.
- Determine the user attribute setting logic as user_set, user_setOnce or user_add based on the user attribute storage rules.
- Get the fields that need to be written to the user table from the specified event or all events, and write them to the user table with the given attribute name and type.
# Data Storage Check
Lastly, please check whether the TE system has received the callback data from Adjust. You can check it by following these steps:
- Check in Details Tab Page
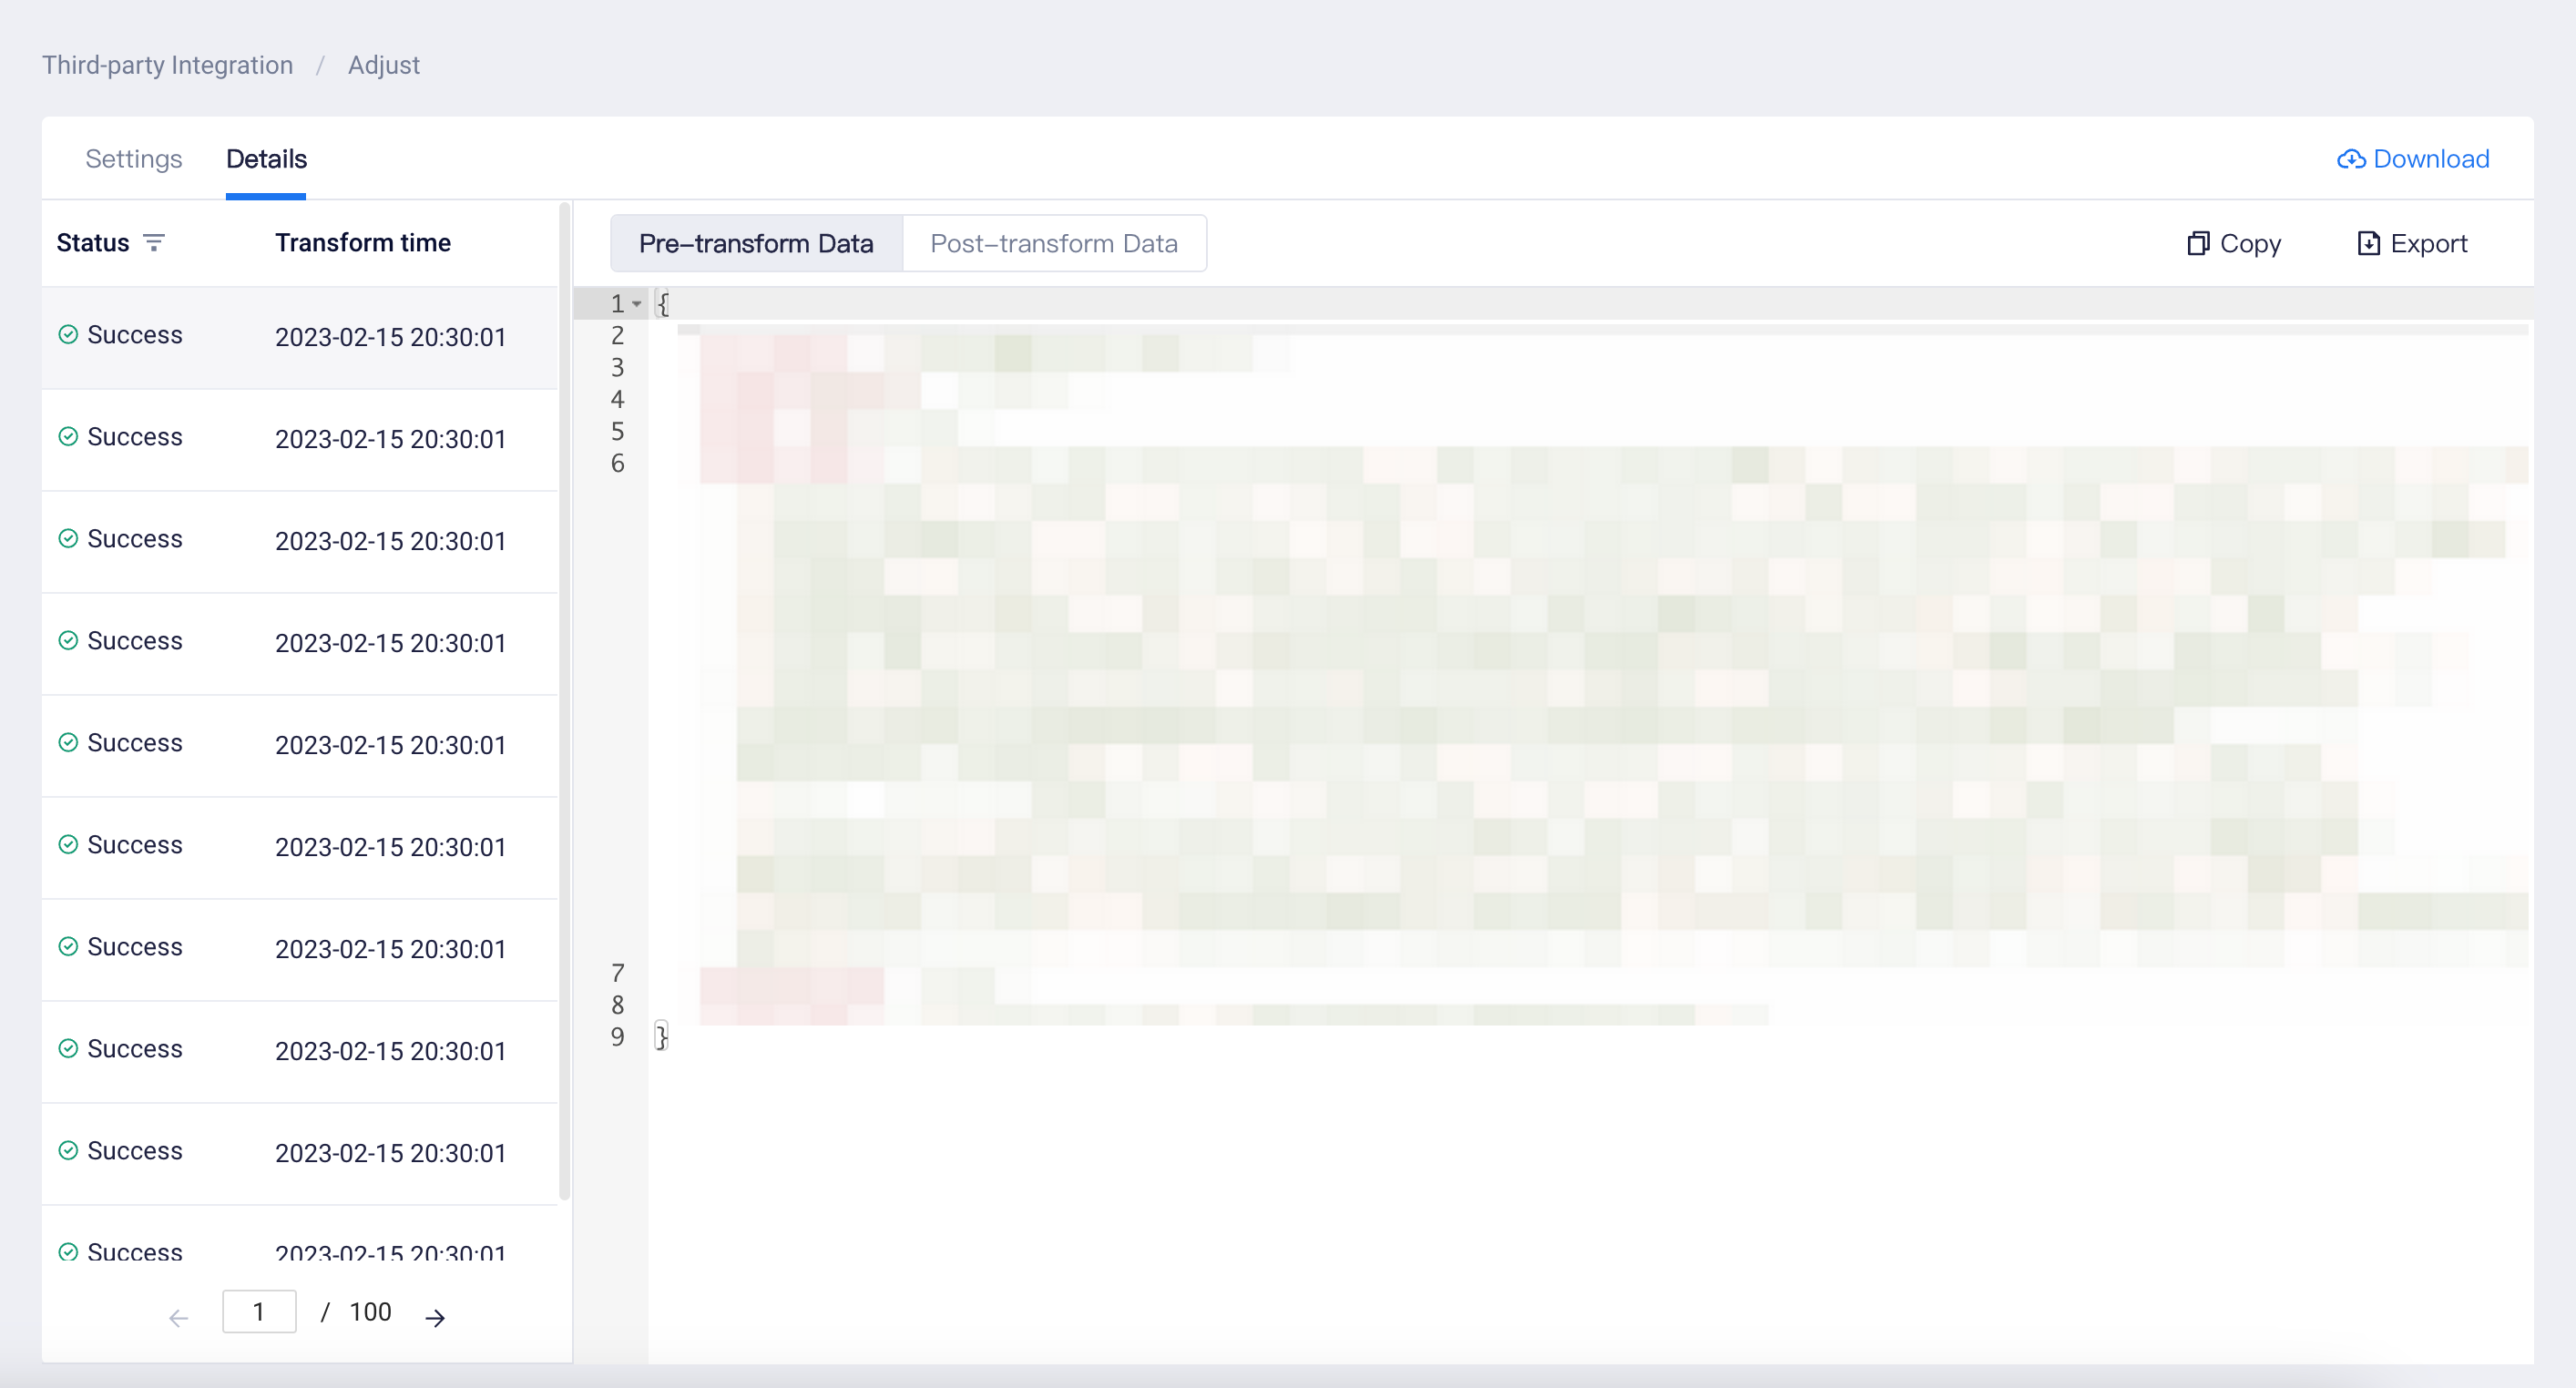
If the platform access status is "Accessed", it means that the data has been received from the platform and stored. At this point, you can view the last 1000 received data on the "Details" tab of the Integration page. Click on a specific row to view the details of the data, including the data before and after conversion, and you can copy or export the data, or click the download button on the upper right corner to download the complete data:
- Check in Other Product Modules
Apart from the integration page, you can also check whether the callback events and user properties have been created in the "Data Management" page.
You can also check whether the data has been stored by analyzing it in analysis models, such as event analysis models and user property analysis models.
